Tag Archives: family

Winter Treats: Make your own Candied Ginger

16 Feb

CGlead
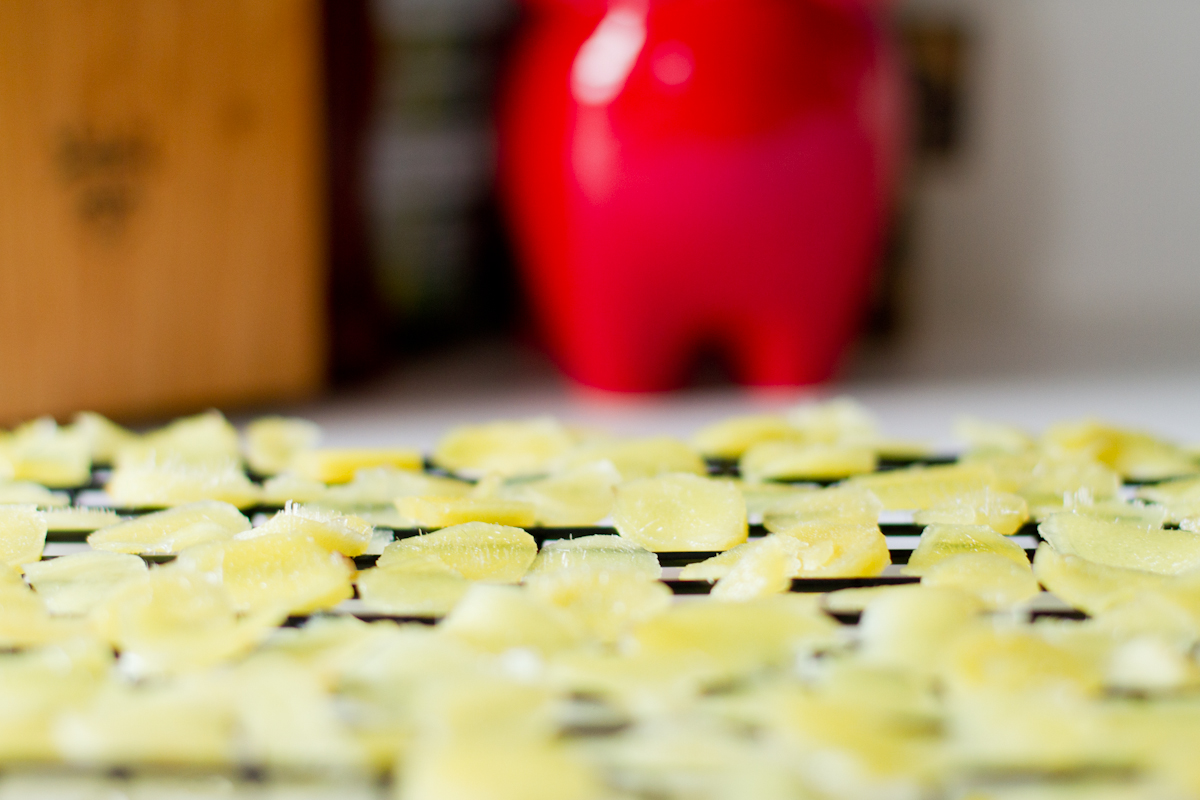
Turns out, making candied ginger is really easy. And much cheaper to make on your own as opposed to buying a small package in the store.  Plus, once you make your own, you’ll have a long lasting supply of candied ginger that you can access at home, at the office, in the car…wherever!

I was never a hardcore fan of the store bought variety. I actually don’t think I’ve ever purchased a package of my own. But there was a quality about the flavor and the small, sugary slivers that I did enjoy. So that is what lead me to making my own.

CG-4

CG-6

The process is pretty simple. If you can boil water, you can make these candied ginger treats!

CG-8

Ingredients:

  • Ginger Root (As much or as little as you’d like to make)
  • Sugar
  • Water

To make:

  1. Peel the outside layer of the ginger root off using the concave side of a spoon
  2. Slice ginger root into thin rounds
  3. Bring equal parts water and sugar to boil and add in the sliced ginger root. Lower the heat and let simmer for about 30 minutes
  4. Strain ginger from liquid. 
  5. Place sliced ginger on baking rack and let dry for at least 5 hours
  6. Toss ginger slices in a bowl with sugar
  7. Enjoy

Clementine (Orange…) Pistachio Muffins.

10 Jun

op-9

I was lucky enough to get a copy of Jennifer Perillo’s new cookbook Homemade with Love, featuring recipes from her blog In Jennie’s Kitchen. I chose to write up a review of one of the many difficult to choose from recipes, but ended up going with the delicious Clementine and Pistachio Muffin recipe. Not only was it fun to make, it was a joy to photograph. Here’s part of my post from Eat Boutique:

As soon as I unwrapped Homemade with Love, the newly released cookbook from Jennifer Perillo, I knew this was going to become one of my favorite cookbooks. Yes, I was absolutely judging this book by its cover, and I happened to be completely correct about it.

op

Reading Jennifer’s story of how she came to her current place in life, the lines between cookbook and the start of a really great novel became slightly intertwined. I was not familiar with Jennifer’s blog or her story, but know now that I will be a reoccurring visitor to In Jennie’s Kitchen.

Homemade with Love could double as an owner’s manual for the self-sufficient kitchen. Providing both a list of must have pantry items, as well as recipes for easy-to-make basics – you’ll be off to making truly homemade meals and treats right away….


To read more about my experience with this amazing recipe, as well as recipe for it, I urge you to go to read the rest of my post here. And also, be sure to check out Jennie’s blog if you have not done so already!

Boston Local Food Festival

11 Aug

On Sunday October 7th, 2012, the Rose Kennedy Greenway will host the 3rd annual Boston Local Food Festival. The festival is a celebration of local food, local farms, local businesses and more. There will be plenty of music, samples and activities all day long. In addition, there will also the the Local Craft Brew fest on October 5th featuring some of the best local breweries around!

I am excited to be blogging for this event, getting to know some of the sponsors and participants while at the same time sharing information with you all! The first company I got to know a bit better was Olivia’s Organics. You can my article about them on the Boston Local Food Festival blog.

Stay tuned for more with some of the festivals sponsors and participants!

Shortbread Pop Tarts.

25 Mar

Homemade shortbread pop tarts? Uh-huh.

I had been looking for a way to make pop tarts from scratch. The filling was the easy part, the crust is what was perplexing. Recipes I had seen all call for making the crust with pre-made pie crusts. Meh.

Let’s be honest here, pop tarts don’t taste like pie. That’s why Hostess Fruit Pies exist.  So all of those recipes calling for pie crust use in this case are wrong. (Or, at the very least, terribly misguided.) After much consideration, I decided that the best option for crust would be a homemade shortbread crust.

As my friend Shari would say: Holy cats!

The shortbread is sweet and buttery and delicious. I flattened the dough into small rounds, placed some decent quality mixed berry preserve in the middle and topped it with another flattened dough the same size as the one on the bottom. These would definitely make Lorelai Gilmore go nuts – aside from the make it from scratch part.

Slice off the sides to give the pop tart its shape. Then, put in the oven for 20 minutes. Once they’re done, take them out and let cool. Drizzle the icing onto the top and add sugar. It’s really that simple.

Ingredients:

  • 2 cups butter (unsalted)
  • 1 cup dark brown sugar
  • 4 cups flour
  • 1/2 tsp. salt
  • jar mixed berry preserves
  • 2 cups confectioners sugar
  • 1/2 cup milk
  • decorative sugar

Recipe:

Preheat oven to 350°F

Mix together the butter and sugar first. Make sure the butter is room temperature so that it mixes well with the sugar. Once they are mixed, add in the salt and gradually add in the flour.

Next, chill the dough for a few minutes until it is easy to form little pancake like shapes. Put a heaping tablespoon of preserve in the middle and spread around. Cover with another pancake shaped round of the shortbread dough. Trim the sides into a pop tart shape/size.

Once they are formed, put on a greased baking sheet and bake for 20 minutes.

While that cooks, mix together the confectioners sugar and milk. (Add in the milk one tablespoon at a time to be sure the icing doesn’t become too runny.)

Take baked tarts out of the over and put on cooling rack to cool. Drizzle on the icing glaze mixture and top that with decorative sugar.

Parsnip & Leek Smash

8 Mar

Parsnips and leeks, you say? Indeed. And with the addition of a little creme fraiche, this turns into a delicious side for any meal.

This is a great substitute for boring mashed potatoes, and though it’s simple to make with just three ingredients, it has a complex flavor that you’ll be craving time and time again. And it’s a pretty healthy dish, too.

Ever since I started adding parsnips into my regular rotation of vegetables, I have not been disappointed. The albino cousin of the carrot doesn’t particularly look like more than just an ordinary root, but it has a nutty flavor that really stands out. I prefer to leave the outer skin of the parsnip on, as it isn’t very thick and adds a nice texture.

These parsnips were given to me at the end of the growing season in late fall and I just now have gotten around to using them. They were grown organically at a local farm and were stored properly for a couple of months, allowing the fresh flavor to last well into winter.

And lest we forget the other main component of this dish, the leek. I find it is another underutilized vegetable with a lot of flavor. It’s related to onion and garlic, and works very well together with the parsnips.

Once the veggies are cut and boiled, put them in a bowl and use a potato masher to smash them all together. Add in the creme fraiche, salt and pepper and plate next to your main dish.

To make:

Ingredients:

  • 3 medium sized leeks, cut into 1/2″ rings
  • 1 pound parsnips, skin on, cut into 1-2″ chunks
  • 1/3 cup creme fraiche
  • salt and pepper to taste

Instructions:

Bring a medium pot of water to a boil, and add parsnips and leeks. Let cook in boiling water until soft, about 15-20 minutes.

Remove from water and place in a medium sized bowl. Smash up the leek and parsnip together until mashed together. Add in creme fraiche, salt and pepper and mash together some more. (You can make this as smooth/chunky as you want, I prefer it somewhere in between.)

Plate and serve. You could garnish with nutmeg or a small dollop of creme fraiche.

Cardamom, Vanilla & Orange French Toast (in a skillet!)

12 Feb

Winter has finally arrived here in New England, in mid-February. Well, maybe there isn’t any snow yet, but it’s frigid out. The sunshine and blue sky are deceiving. All I want to do is to be outdoors somewhere enjoying fresh air, but I hear the wind and bare tree branches clicking, and instead of outdoor activities, I think about what there is for me to eat.

And it’s that time on a Sunday between breakfast and lunch, so of course, brunch ideas come popping in.

You guys know about brunch, right? I ask only because a few weeks ago we were out enjoying some brunchy delights in Cambridge, and the couple at the table next to us HAD NEVER HEARD OF BRUNCH.

“You mean we can get something from the breakfast menu or the lunch menu? And what’s this ‘Brunch’ menu here? Can you explain ‘brunch’ to us?” Really?!?! REALLY.

They talked about what a great idea this brunch thing was for about 15 minutes. It was all very serious. And equally as disturbing. The term “brunch” was coined in 1895. 117 years ago. Perhaps I should have mentioned having a “midnight snack” to them and completely turned their world lopsided.

Anyway, brunch.

I got to thinking about what I felt like eating on this cold Sunday. French toast was sounding good. But so was something baked. And here was where I had a craving for a baked brioche french toast with hints of vanilla, cardamom and orange. (Totally normal craving, I might add.) I bundled up for a quick trip to the store and fifteen minutes later was back home in the kitchen.

This was one of the simplest and quickest meals to put together. Cut up the Brioche into thick slices and set 1/2 of the loaf aside. With the other half, break up the remaining slices into quarters. Leave them in a pile for a moment.

Add together the rest of the ingredients in a medium sized bowl and mix. Drop the bread in and let it soak.

The great thing about this recipe is that you can use the soaked bread pieces immediately or you could let them sit overnight in the fridge. This way, when you wake up in the morning, all you have to do is put this mixture in an iron skillet or glass bakeware and pop it in the oven for a half hour while you wake up, take a shower, hit the snooze button, etc.

Once the soggy bread is in the skillet, place it in the oven. Thirty minutes or so later you have breakfast. And an incredible smelling kitchen! Seriously, you’ll want to roll around in this smell. It’s good.

Carve out a slice and add on some fresh whipped cream and/or maple syrup (the real stuff!). This will be an amazing breakfast/brunch experience right at home. And because of the cardamom, this dish will pair very well with a citrus based drink, such as lemonade, orange juice or Mimosa.

Continue reading

Blackberry & Kumquat Filled Brandy Tuiles.

13 Jan

Now. Look at these. Look at them closely. You know how you are studying them, imagining how incredible biting into any of them would be? Take that taste in your head. Multiply it by at least 17,000. That’s how good they are.

Let’s talk about the Tuiles, shall we? Crispy little cylindrical brandy wafers filled with Greek yogurt, blackberry jam, clementines, kumquats and black pepper. Oh man.

These little tubes of tastiness really get your tastebuds up on their feet. They are a perfect way to end a meal. Or a perfect snack to eat while watching TV. Or right before bed. If you made them right, you could probably have them for breakfast too…maybe add some apple and cinnamon into the mix?

These tuiles were just one of the desserts Molly Loveday made when she created this dinner. As an aside, we were also invited over for dinner last night. Homemade Gnudi pasta. Oh my.

I’m getting way too used to this having an awesome neighbor thing.

Continue reading

Tagliatelle and Littleneck Clams in a Gin-Basil Jalapeño Sauce.

12 Jan

Eating is always better when I don’t have to cook anything  for myself. That is why I love having a close friend who is also an incredible chef.

On Friday night, my pal Molly Loveday invited Joe(y) and I over for dinner. A late dinner. Like, come over at 8:30 and we will start to get the ball rolling kind of late dinner. (By “get the ball rolling”, I mean I’ll watch you get all of this edible amazingness ready while I take pictures and drink Lambrusco.)

Molly makes real food, from scratch. She was trained by and has worked for an impressive list of people.  She knows exactly how to pair this with that. She understands and utilizes local ingredients at their peak. Everything always tastes flavorful and fresh. Molly even makes her own sparkling water and places it on the table with a glass that has your name on it. Now that’s service… I mean, friendship. That’s friendship!

Molly dressed her table with bunched herbs and fresh scallions, which just happen to be ingredients in the meal we will be feasting on.  And the table itself…Well, it’s a black and white enamel topped Hoosier table. The body of which was lovingly and professionally  restored (along with the bench) by her father. We are christening it tonight. It was just carried in about an hour or so before we arrived. The paint may or may not still be a little tacky.

On the menu for the evening:

  • Mackerel Tartine
  • Lentils, cauliflower and herbs topped with pomegranate seeds
  • Tagliatelle with littleneck clams in a gin-basil jalapeño sauce
  • Brandy Tuile with kumquat marmalade
  • Chocolate Caramel Tartlettes
  • Molly’s Blonde Fudge

I know, right?

The tagliatelle dish was completely filling and perfectly balanced. The jalapeño peppers added just enough kick to bring the fresh pasta to a higher level of being, especially when joined with the scallion. And I don’t believe you can ever go wrong with adding in littleneck clams.  (You can find the recipe for this dish at the bottom.)

Dessert pictures and recipes will be forthcoming. But let me just say, handmade blonde fudge and brandy tuiles beg for your attention. Stay tuned…

I’m excited and privileged to have Molly as one of my closest friends. I’m also elated that she has moved only a few blocks away. In any spare time the two of us may have, I know I’ll be heading over to her home any chance I get (for obvious reasons.)

Molly is currently putting her culinary talents to use right in your own kitchen! If you live in the Boston area and would like to have a private cooking lesson in your own home, or think someone you know would enjoy this as a gift, you can contact Molly for more details at ChefMollyLoveday@gmail.com

Expect more collaborations from Molly, myself and Joe(y) in the near future. Until then, give this main dish a try…

Continue reading

Wedding Gift: Customized Wooden Cutting Board.

2 Jan

Right before Christmas I received a package in the mail. To my surprise, it was not a Christmas present at all, but a wedding gift. And it was a pretty freaking great one at that.

My cousin Michael and his lovely wife Denise (I’m guessing it was mainly Denise who did the work here) sent a customized wooden cutting board to us as our wedding present. It has my newly hyphenated name and the year of the wedding etched into the wood.

It is really an incredible gift for someone who loves to be in the kitchen as much as I do. I have gotten over my reluctance to use the board (for fear of damaging it in any way) and baked up a nice treat with it that I’m going to share as my next blog post. I really am kind of in love with this as a gift idea!

Bourbon Soaked Cherries.

14 Dec

Last weekend while Joe(y) and I were away for the weekend visiting Provincetown, we stopped in for an early dinner and some drinks at one of my favorite places to eat. In addition to ordering dozens of oysters and a Pale Ale for myself, Joe(y) ordered an Old Fashioned. The waitress apologized that they no longer had the bourbon soaked cherries for the Old Fashioneds, and that they only had the regular maraschino cherries.

Wait. Back up. BOURBON SOAKED CHERRIES? Yes.

So. Of course. We then decided it was necessary to make our own. Somehow, there were fresh organic cherries for sale in December where we get our produce. We found a basic recipe online on how to preserve cherries whole in sugar syrup. But we can do better than just bourbon infused cherries. We expanded on the idea by including bourbon, cloves, orange peels and fresh ginger slices.

Yes. I’m totally pitting the cherry with a paper clip half unfolded. And yes. It does work! Joe(y) found that tip online (via Martha Stewart, of course).

Now, we haven’t actually been able to try the finished cherries yet. They need to macerate and absorb the flavors (and alcohol!) for at least a week. However, since we canned them in glass jars the proper way, these delicious cherries should last months in the fridge/pantry.

I snuck a taste of the syrup/bourbon/cherry/awesome concoction and, um, it was pretty freaking delicious. I can only imagine that the finished product is going to taste 5 billion times better. If that’s even possible.

These are going to make great gifts to friends and family for the holidays. It was also a fun way to spend an evening at home with Joe(y). We took turns between photographing and food prep and created something pretty awesome. Enjoy!

To do this, you’ll need:

  • 1 1/2 pounds of fresh cherries
  • A bottle of your most favorite bourbon and/or whiskey
  • 3 cups of sugar
  • 2 cups of water
  • Small to medium piece of ginger root
  • One orange
  • Whole cloves

Wash the cherries in water and then pit via the method above. Prepare the mulling flavors by piercing orange peel with whole cloves. Slice fresh ginger into round chunks, each about a half inch thick. Set aside.

In a pot, bring 2 cups of water and 1 cup of sugar to a boil. When the sugar dissolves, add in the orange peel, cloves and ginger. Lower hear and let simmer for five minutes, stirring occasionally. Strain the syrup through a strainer to remove cloves, ginger and orange peel.  Return liquid to heat and return to a boil.

Add in one cup of cherries. Leave in for about 2 minutes to allow them to blanch. Remove with a hand strainer and set aside while repeating until all of the cherries have gone through this process.

Save about a cup of the syrup and add to it 2 cups of sugar. Bring to a boil, again allowing the sugar to dissolve. Then, remove from heat and let cool slightly. Add in about three cups of bourbon. Mix well. Fill jars with cherries and cover with whiskey/syrup mixture.

Seal. Wait. (Like, at least a few weeks.). Love.

Depending on how properly you can these, they will last for several months if stored properly.