Tag Archives: diy

Finished! My Reupholstered Victorian Chair

17 Sep

FInished Chair

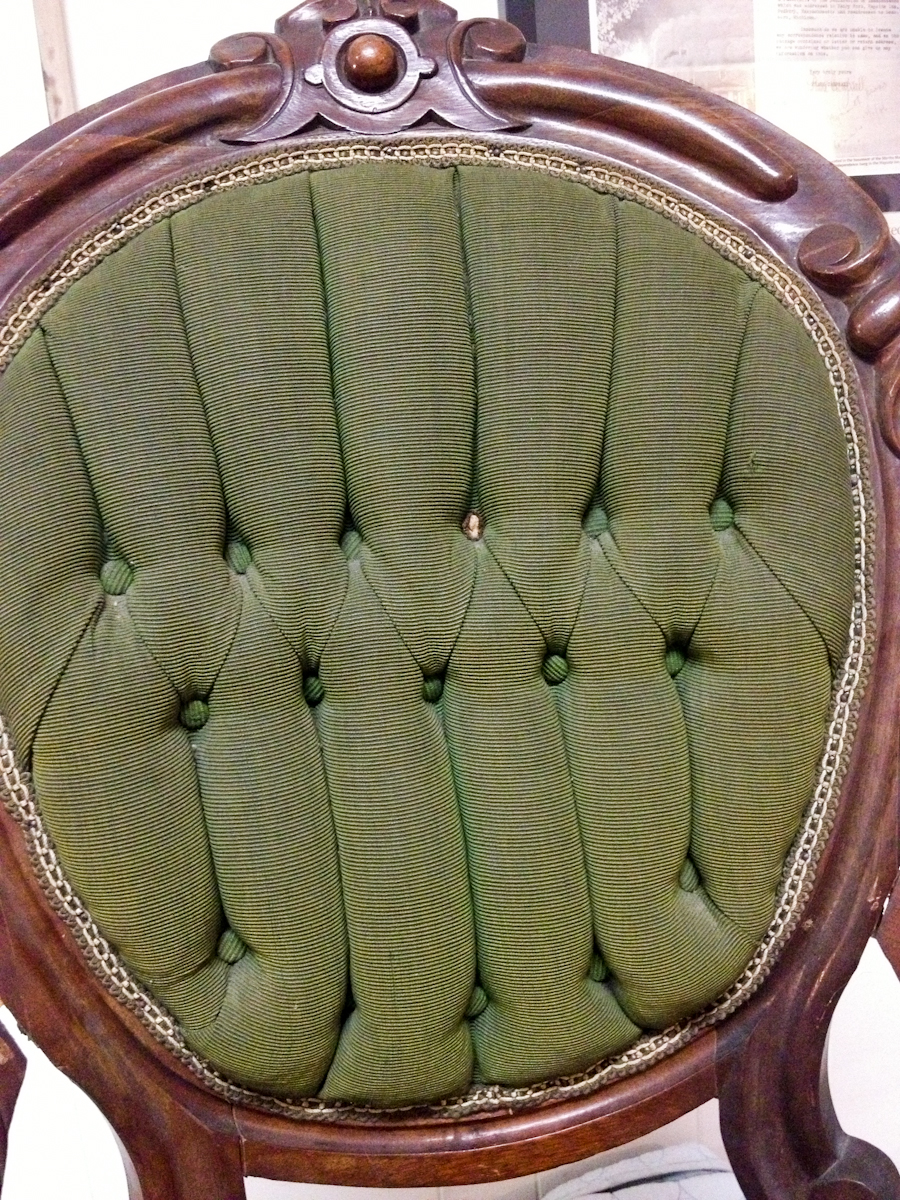
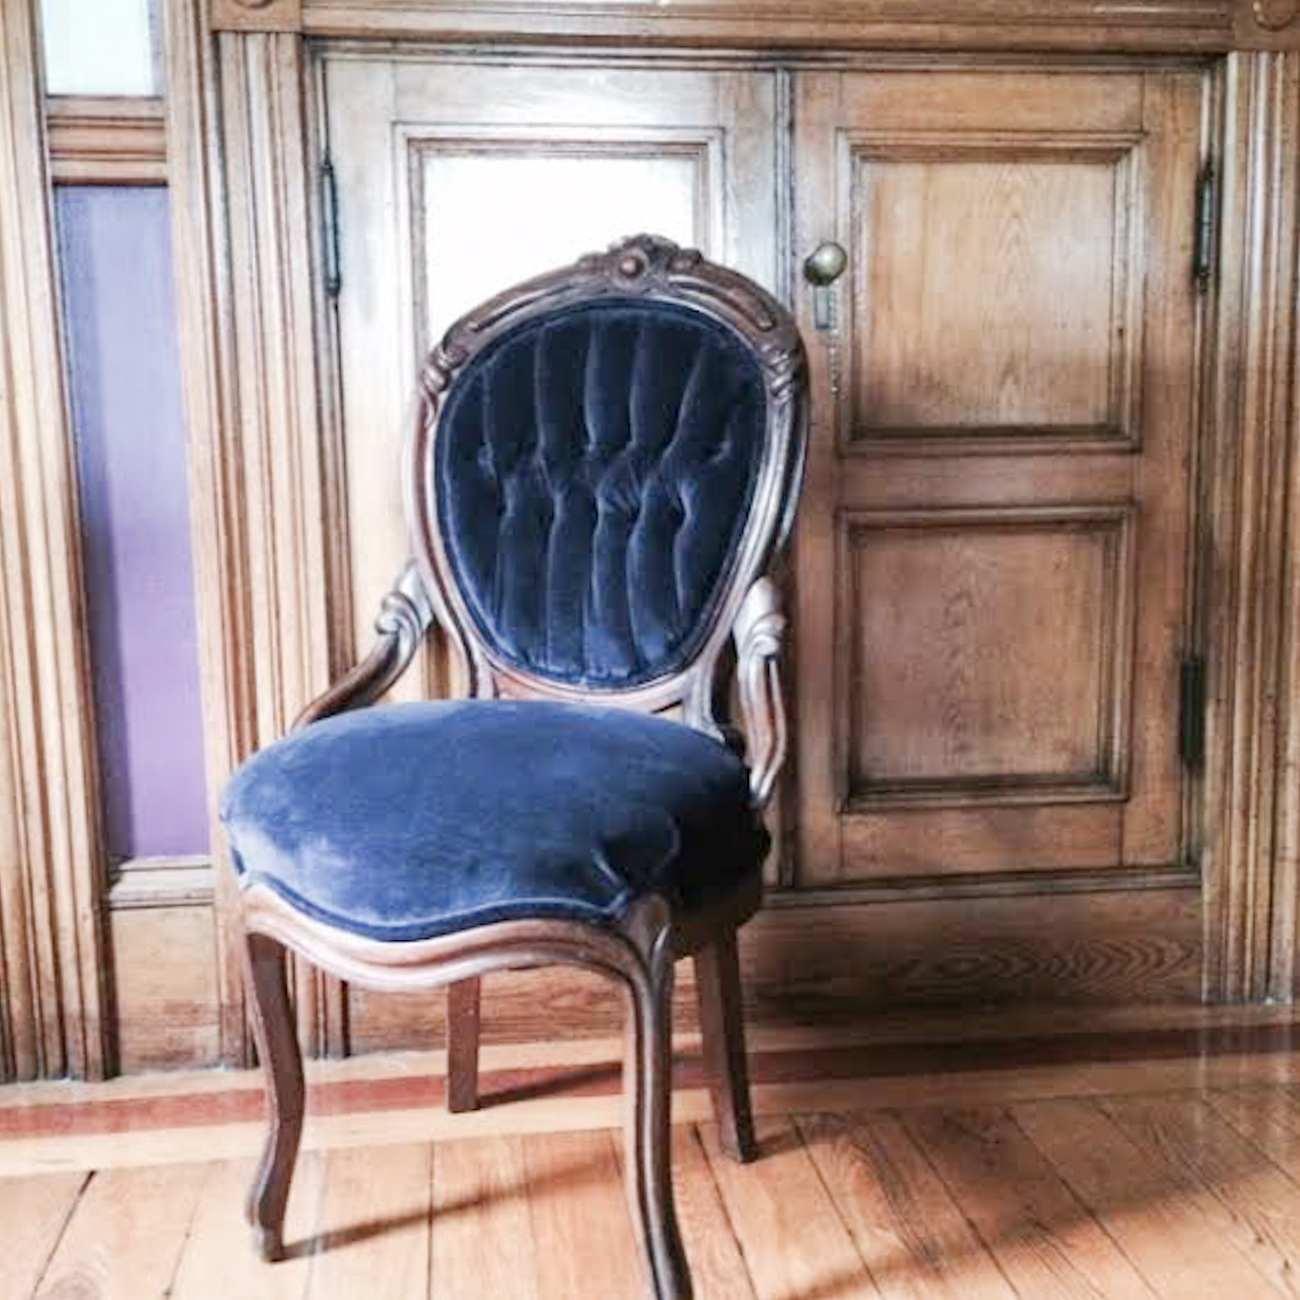
So it may have taken a year, but this chair is finally complete! I put so many hours into this piece and enjoyed every single minute of it (except for maybe the multiple tacks I hammered into my fingers).

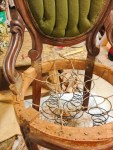
Here’s a shot while I was adding the double welt around the edges…

double weltI made each button on this chair by hand and secured each individually. I folded and unfolded so many times to get the seams and crevices aligned perfectly. I fluffed and set the horsehair and hoghair inside the seat and the back to get it all arranged just right. I tied each spring in the chair eight ways and tacked the twine into place.

The devil is in the details, but the details are what make this chair stand out!

chair-2-2

The chair has definitely transformed from its previous (and original!) fabric…

Chair Before

While I did enjoy the original design, the fabric was worn and dingy, especially on the seat. I tried to mimic the original design in my version. The instructor of the class was very impressed with the original details (which made me feel like a horrible person for tearing it all off!) but was also pleased with the amount of effort and thought I put into the redesign.

Classes were always exciting and there were plenty of points I wouldn’t have even thought about, so having a teacher who has decades of experience in reupholstering the right way was a blessing. There are two ways to do things: the easy way and the correct way. While it takes a little more patience and time, I like to opt for the correct way in situations like this, especially if I am using energy and time to learn a skill.

chair-10

There was a lot of “measure twice cut once” running through my head. To further complicate things, I had to be sure to cut the fabric so that velvet all ran in the same direction…otherwise it would have affected the colors matching perfectly…something I probably would not have come up with on my own.

I ended up giving this chair to my mother for her birthday, as it was nice to be able to gift something I made with my hands (other than food for a change!) and to give her something that held something special as opposed to something store-bought. It also fits in nicely with her circa 1881 home.

I’m looking forward to my next reupholstering adventure soon!

Turkish Pickled Ramps

23 Jul

While cleaning out my fridge, I found this jar of pickled ramps that I prepared at the end of April (when ramps were in season…). While it may not be pertinent to the summer harvest, I still enjoyed making these photos and the shoot that accompanied it, and am sharing them here.


pickled ramps-6

pickled ramps-7

pickled ramps-9


pickled ramps-12

pickled ramps-13

pickled ramps-15

pickled ramps-21

pickled ramps-17

pickled ramps-22

For ingredients and instructions on how to make these addictive pickled ramps, head on over to my piece at EatBoutique.com.

Winter Treats: Make your own Candied Ginger

16 Feb

CGleadTurns out, making candied ginger is really easy. And much cheaper to make on your own as opposed to buying a small package in the store.  Plus, once you make your own, you’ll have a long lasting supply of candied ginger that you can access at home, at the office, in the car…wherever!

I was never a hardcore fan of the store bought variety. I actually don’t think I’ve ever purchased a package of my own. But there was a quality about the flavor and the small, sugary slivers that I did enjoy. So that is what lead me to making my own.

CG-4

CG-6

The process is pretty simple. If you can boil water, you can make these candied ginger treats!

CG-8

Ingredients:

  • Ginger Root (As much or as little as you’d like to make)
  • Sugar
  • Water

To make:

  1. Peel the outside layer of the ginger root off using the concave side of a spoon
  2. Slice ginger root into thin rounds
  3. Bring equal parts water and sugar to boil and add in the sliced ginger root. Lower the heat and let simmer for about 30 minutes
  4. Strain ginger from liquid. 
  5. Place sliced ginger on baking rack and let dry for at least 5 hours
  6. Toss ginger slices in a bowl with sugar
  7. Enjoy

EHChocolatier.

21 Nov

EHC-2

I know I still have to update my reupholstery project progress. Until then, here’s a post and some photos I did for Eat Boutique. It features the amazing creations of EHChocolatier out of Somerville, Mass. You’ll be able to experience them in person at this year’s Eat Boutique Holiday Market in Boston in about two weeks!

I have heard great things about EHChocolatier for quite some time now, but had yet to experience their products first hand. It took me a while, but now I understand why everyone who enjoys quality chocolate is so excited by this maker.

EHC-3

The assortment of bonbons and confections available from this Somerville, MA operation are as appealing to the mouth as they are to the eye. Just one glance at any of the products offered by EHChocolatier, and you can tell you are in for a rewarding experience.

These chocolates are made with love, which gives each of them a unique glow one can see and taste. When discussing the business with Elaine Hsieh, cofounder of EHChocolatier, I inquired about her favorite product to produce and/or consume. Her response -“ Egads, that’s a difficult question to answer!”  – sums up the product line and its appeal. She went on to say that “All of our products are especially delicious when they’re still a little warm and just made.  I never tire of making ganaches and watching them come together through all the different stages while I’m stirring along.  It’s a thing of beauty and it never gets old.” Her passion clearly carries over to the final products.

EHC-4

Find out more about the Eat Boutique Holiday Market and EHChocolatier by using this link!

Upholstery Class: Week One.

25 Sep

chair-8

After wanting to take an upholstery class for a while, I finally was able to get in and sign up before all of the spots were filled in this 9 person learning experience. I also purchased a spot for my husband, as he is also interested in learning how to restore furniture appropriately. 

I found this chair on Craigslist for $48 and it was exactly what I had in mind. It was an antique and had character in its bones, which I suppose were my only criteria. Upon starting  to take this apart, tack by tack by tack, it became clear that this chair had originally been crafted with great care. The instructor noticed this as well, and commented on the hand sewn details of the interior, the hog hair filling, the burlap crown on the inside of the cushion filled with more hog hair, and the different sized tacks used for differing details.

chair-9

Another interesting part which I loved about the chair, as did the instructors, was the backrest of the chair. The fabric had been sewn, tacked and held in place with handmade buttons in an intricate way which would have taken great skill and talent to accomplish. It may not show in the photo below, but it is quite impressive in the flesh (fabric?).

chair-4

The underside of the chair was dusty and dried out, and was easy to take apart. With each tear and pull, more dust floated out and I was able to get a clearer view of the springs.


By the end of the three hour class, I had removed EVERY tack, which was one of the most meditative and relaxing things I have done in a long while. There was something so satisfying about pulling and picking out each individual spike. The only thing left intact is the fabric and hog hair on the front of the backrest. This is to preserve the uniqueness of the chair, and replicate it when reupholstering it.

I will update my progress here as the weeks go on. Now to decide on a fabric….

Slow-Roasted Tomatoes. And Cheese. And Bread.

8 Sep

photo 5

We had already made a tasty dish this week utilizing a pint of tomatoes from our CSA box from Saltbox Farm in Concord. There was still another pint waiting around the kitchen, nearly a week later, with not much inspiration to be found for it.

 I was flipping through Jennifer Perillo’s book Homemade with Love for dinner ideas and found a simple recipe for slow-roasted tomatoes. I headed into the kitchen, grabbed the tomatoes  and sliced them up. After following her simple instructions, I had a warm dish of late summer perfection to devour.

While the tomatoes were roasting in the oven, I ran out to the store for bread, apples, pears and fig jam. Oh – and cheese – Herve Mons Morbier; Emmi Gruyere Reserve; and Les 3 Comtois Comte. The tomatoes have definitely won out as the favorite cheese and bread compliment this evening. I am surprisingly full with nearly half of the cheese still remaining – quite an oddity in my presence.

The recipe, courtesy of Homemade with Love:

  • 1 pint grape tomatoes, cut in half
  • 1/4 cup extra-virgin olive oil
  • Fine sea salt and freshly ground black pepper
  • 6 sprigs fresh lemon thyme, chopped

Preheat oven to 250 degrees. Add everything to an 8-inch square baking dish and toss. Adjust seasonings to taste. Bake until tomatoes are slightly collapsed and tender, about an hour. Enjoy warm or store in fridge for up to two weeks.

Homemade Caraway Seed Mustard.

6 Jun

Homemade-Mustard-01

Maybe it just occurs in my kitchen, but I’ve noticed a small collection of condiments rapidly taking hold over the shelves on my  fridge door. Horseradish, chutney, peanut sauce, relish, and mustard – just to name a few of the residents. Looking more closely within the mustard neighborhood, I decided it might be time to try creating my own mustard. It’s really quite a simple process, and the customization opportunities are only limited by what you can come up with in your head.

I searched through my spice rack to see if any inspiration would develop, and then I came upon the caraway seeds. I added the seeds to a traditional mustard recipe and what developed was a spicy mustard with a rye bread familiarity. This would be perfect for both creating a filling reuben or for something more simple, such as dipping fresh baked pretzels.

Giving the flavors a day to settle in gave this mustard a completely different vibe. It went from a subtle tangy kick to an all out spicy attack on my taste buds, which I must say I enjoyed wholeheartedly. The level of heat you prefer can be negotiated. If you want a spread that is less spicy, do not grind the mustard seed too finely. The more you grind the seed, the spicier your mustard will become…

For my recipe, head over to Eat Boutique!

Sometimes I’m busy…

30 May

Sometimes two months goes by and I’m all like “Didn’t I just update my blog last week?”. No. That was 10 weeks ago.

Since then, I’ve turned another year older. Driven the Pacific Coast Highway from LA to San Francisco. Saw President Obama’s motorcade. Purchased a second car. Built a fence out of wooden pallets. And I’ve started running again.

I’ve been enjoying the warmer New England weather and the outdoors in general. The flowers are starting to bloom and there is life in the backyard again. One of my favorites, the columbine, is a simple flower that has welcomely taken root throughout my yard, and its seed pods make it super easy to spread to new spots.

yard

While out for a walk a few nights ago, Joey and I came across this wooden rocking chair sitting next to someone’s trash barrels ready to be destroyed. We headed straight home, got in the car and claimed ownership. It’s rock solid, for real.

yard-2

In addition to the rocking chair, I’ve added some new plantings over this past weekend, including the pink lupines below. They fit nicely in the border under the birch tree clump that I planted last year.

yard-3

I’ve been working on some food related posts which will I’ll be sharing in the near future…but I guess I have been busy, just not blogging. And I miss it. And I’ll be back more often.

A new endeavor…

22 Oct

I am excited to announce that my first post writing and photographing for Eat Boutique, an online magazine and market,  is up! I truly admire the aesthetics and ideas behind what they have accomplished, and I am honored to be a part of it, in whatever small way I am able.  I urge you to go check out eveything they have put together over the past several years.

Below is an excerpt from my first contribution on how to make a delicious and filling veggie taco (Hint: Fried Green Tomatoes).

“Being a carnivore married to a vegetarian can sometimes be a challenging adventure. Over the past ten years I have been enlisted as a vegetarian-by-default at many a meal. During this time, however, I have grown to appreciate plant-based foods in ways that still surprise me. Using vegetables in unexpected places to fill the void in a meatless marriage has become a skill I am still honing, but there are those moments when a vegetable dish leaves me completely satiated.

Vegetarian tacos have been a recurring presence in my kitchen and typically involve a frozen meat substitute defrosted and flavored with a taco seasoning packet – and a lot of cheese. This dish, however, has none of the previously mentioned vegetarian taco curses. Using the leftover green tomatoes gathered from my garden right before the first frost settled in, I refocused the vegetarian taco into an exciting, fresh and multi-layered delight.”

Click here to read the rest of this post and to view images of how beautiful this dish is….

Stitch by KMIDesign – Cambridge, MA

9 Sep

Here’s a post about one of my favorite Massachusetts designers Kate Maloney Interiors (written/photographed by my favorite person!). Check out Kate’s storefront, Stitch, in Cambridge, Ma and see all of the uniquely awesome items she’s picked up to pass on to you!

Joe And Sometimes (y)

Image

Ever look at a shelter magazine or blog and see spaces that look frigid and sterile? You sit and wonder, “Does someone actually live there? Ok, clearly these people don’t have kids or pets or personalities.”  Well if that is your impression of what high-end interior design looks like, look again.

Cambridge based Kate Maloney Interiors creates gorgeous spaces that are meant to be lived in by the whole family.  Kate and her team infuse each project with a quirky mix of pattern, color and texture.  Though usually not one for labels,  Kate’s style could possibly be coined as, “Cantabridgian Chic” or perhaps “Boho Modern.” Whatever the label you come up with, each home is always a great balance of the old and new; creating spaces that are timeless, stylish and always functional.

Established in 2003, Kate’s design office recently expanded to include a new retail venture called Stitch. “After…

View original post 167 more words

Bantam Cider Company

8 Sep

Thirsty? Check out Bantam Cider Company from Massachusetts. A local company using nearby orchards to make their deliciously flavorful cider. I wrote a bit about them, here’s an excerpt:

 The company chose their name because “the word bantam means small and mighty. When we were looking for a name, we wanted something that was a metaphor for our home market of Boston and at the same time, would embody our company – which is a small cider company in a sea of very large beverage brands.” explains Michelle da Silva of Bantam.

Bantam Cider Company’s first endeavor is a cider they have named “Wunderkind”. The name is in honor of one of the greatest modern adventurers, Amelia Earhart, who just happens to have local ties as well.

At the moment, Bantam is concentrating their energy on creating a variety of ciders. The company hopes to focus on cider in a way that people begin to reshape the way they experience it. Bantam has been experimenting with several new ideas, including a heavier farmhouse style cider and one with some accents of other fruits and spices…

…With autumn fast approaching, Bantam Cider Company will be starting up production again in late September/early October. At that time, apples fresh from central and western Massachusetts vineyards will be pressed for sweet cider. Bantam then adds yeast and ferments the cider in stainless steel tanks. Once ready, the cider is then blended to create the final product.

You can read the rest at the Boston Local Food Festival blog!

Make a Gooseberry Smoothie.

7 Jul

For some reason, this past week has seen me and smoothies having a serious love affair. I’ve been loading them with strawberries and kale and raspberries and blueberries and anything else I could find fresh. When the produce available at my local grocery store wasn’t cutting it, I ventured on over to my local farmers’ market. There were plenty of vegetables and fruit to choose from. Looking around, I was drawn in by the large, oddly shaped gooseberries. They look like a grape, but at the same time, not at all. 

I remember tasting one last year and enjoying it, but didn’t buy any at the time. They are often used for baking and are featured in pies and other desserts. They are also used to make beverages such as wine and tea. And smoothies.


Now, I wasn’t quite sure what to combine with the gooseberries, but something told me mango. So I did that. And some fresh blueberries. And honey. I added in some frozen peach slices as well for temperature control (I also used some frozen vanilla yogurt for this). A splash of vanilla flavored almond milk to round out the liquid portion and…

It was pretty darn refreshing! And apparently also very energizing, as after having one I went on a six mile walk. For real. 

Recipe…

Ingredients:

  • 1 cup of whole gooseberries
  • 1/2 cup blueberries
  • 3 frozen peach slices
  • 1/2 mango, cut up
  • 1/2 cup vanilla almond milk
  • 3/4 cup frozen vanilla yogurt
  • 2 Tbs raw honey

To make:

Add all of the ingredients into a blender. Turn the blender on. Mix into a smoothie. Drink. (I know. It’s incredibly hard to make.)

Will make about 2 cups worth of liquid smoothie goodness.

The Benefits Of Local Raw Honey.

19 Jun

Okay. So maybe I took a break from this blog. It wasn’t that we weren’t getting along…things just got busy. You know how it goes. Out of nowhere you become occupied with everything at once and before you know it, five weeks have gone by without any contact. It’s okay. We’ve reconnected, and we’re still pals. 

Here’s an article of mine published today on the True Food Movement website. I talk about the benefits of local honey and the downfalls of all that other stuff claiming to be honey you find on grocery store shelves.

Here’s a look…

 …A list of contaminants found in store-bought honey can be obtained by doing a quick internet search, but suffice to say, you don’t want antibiotics or lead with your cup of tea. Those are ingredients that were found in one quarter of Asian honey inspected in 2009, the kind most commonly found in your grocery aisle.

For that reason alone, local honey is the superior choice, but there are plenty more. When you purchase regionally-produced honey, you support your local economy while also creating a greater community for yourself and your neighbors…

Go read the rest at True Food Movement!

Radio Flyer Herb Garden.

9 May

I found this old Radio Flyer wagon while driving down the street one day. Someone had put it out with the weekly trash to be picked up and destroyed. I couldn’t have that. I love old things too much, and my car had plenty of room to fit it.

The wagon has sat in my basement for a good three years, holding random boxes of tools and supplies in the workroom. However, this weekend while in New Hampshire I found a great little nursery with tons of annuals, perennials, vegetables and herbs. Each pot of herbs and veggies only cost $2.99. I couldn’t resist buying some.

Last year I had a couple of potted herbs sitting on the patio. This year, I now have a few more to add. I wanted them in one central location, out of the way, but easy to access for cooking. I saw the old wagon in the basement and decided it would be repurposed as the home of the herb garden.

It’s in a spot that gets a decent amount of sun, but with the wagon, I can easily move it to other parts of the patio if I think the herbs could benefit from even more sun. Once the herbs start to really grow, they should fill the wagon in nicely.

What did I plant?

  • Basil (a must-have for any garden)
  • Cilantro (for taco night and guacamole)
  • Pineapple Mint (for Mojitos to accompany whatever I use cilantro for)
  • Oregano (basic herb, but great fresh flavor)
  • Lavender (for cookies, butter, homemade cleaning products, etc)
  • Thyme (This survived the mild winter we had and never really lost leaves from last year’s growing season)

I ended up placing an extra solar yard light I had into one of the potted herb plants. It will add a little more to the evening atmosphere of the yard and patio. I also had some room to place a small watering can in the wagon as well, so that I can use the rain water it captures to hydrate the plants when they need it. Another thing to note…I drilled a few holes into the bottom of the wagon to drain any excess rain water. This will prevent your herbs from being overwatered if there are holes in the bottom of the pots that are used.

And I also was able to finally fill the raised garden bed I built last year (Post: How To Build A Raised Garden Bed). I’m looking forward to filling that with vegetables and updating their progress here.

Letterpress Weekend Course: Day 2

26 Feb

Today was the second and final day of my weekend letterpress course. Remember how much in love with it I was yesterday? I still feel that way. And will definitely be investing in one of these machines (albeit most likely a much smaller one) in the not too distant future.

The machine we used today to print our designs was a Chandler and Price machine manufactured in 1902. It uses nothing but the power of your own arms and legs. It’s a workout and a creative design session all in one.

The creative part came to me a little too late however. I had no idea what to make. I was over-thinking it all weekend to the point where my mind could not decide on anything. Business cards? Greeting cards? Coasters? As I was gathering materials this morning, I still had no clue. Joe(y) had suggested I make recipe cards, so that’s what I did, sort of.

I made the design. It was a half-postcard half-recipe card hybrid, apparently. I enjoyed having to put everything in reverse. Where the top is at the bottom and the left is on the right. It fits in with my day job quite well as I view reversed images all day long. My brain easily adjusted to this part.

Next, I set the locked frame into the machine and applied the ink color that I had mixed together.

Once the machine had been set and inked, the actual printing process was quite speedy. I realized I probably should have made my form a bit smaller, and not the exact measurements of the size paper I would be using. I know better than that. I just wasn’t thinking.

In turn, I lost one of the lines I set in the process in order to be sure everything else fit it.

While I am not quite sure what exactly I made today, I love that I made something and understand how it all works now.

I have been wanting to learn this craft for a long time now, and have finally done just that. I’ll most likely be going back for open studio time in the near future, this time with an actual design and project in place.

Letterpress Weekend Course: Day 1

25 Feb

Today was the first of my two day crash course on learning how to set and operate a letterpress machine and type. I am incredibly in love.

I have wanted to take a course like this for several years now. I was always either too busy with actual classes that lead to a degree or I would have just missed a deadline whenever the idea popped back into my mind. This year, however, I was determined.

I found the course being offered at a local art school – Montserrat College of Art – and eagerly awaited registering and paying as soon as I could.

Today we learned the basics. How to set type correctly, how to use the machines, how to care for all the materials, techniques, etc. Our instructor was very friendly and insanely knowledgeable about all things letterpress – as well as lots of other things too!

The group of six in the class we all given a topic and asked to set type based on the theme. Our instructor showed us one from a previous class for which the topic was “food”. I wished that was today’s topic (If you’re new to this here blog, just take a look around, you’ll see why). Instead, we got “Myths”. Fine. I’ll work with it.

After setting my type (see the above pic – I apologize for the quality, I didn’t think to bring my actual camera today) we all then put our random thoughts and ideas regarding myths together. The press we used for this project was a Vanderbilt 219.

The final result:

I did the last line “SHE SANG THEM to THEIR DEATHS”. For some reason the only myth I could remember for the life of me was that of the Sirens in Greek mythology. I was super excited to have found little lobsters though. I love lobster.

Tomorrow I’m not sure what I’ll make. Most likely I’ll make some cards to send out. We’ll see what I come up with I guess…

Bourbon Soaked Cherries.

14 Dec

Last weekend while Joe(y) and I were away for the weekend visiting Provincetown, we stopped in for an early dinner and some drinks at one of my favorite places to eat. In addition to ordering dozens of oysters and a Pale Ale for myself, Joe(y) ordered an Old Fashioned. The waitress apologized that they no longer had the bourbon soaked cherries for the Old Fashioneds, and that they only had the regular maraschino cherries.

Wait. Back up. BOURBON SOAKED CHERRIES? Yes.

So. Of course. We then decided it was necessary to make our own. Somehow, there were fresh organic cherries for sale in December where we get our produce. We found a basic recipe online on how to preserve cherries whole in sugar syrup. But we can do better than just bourbon infused cherries. We expanded on the idea by including bourbon, cloves, orange peels and fresh ginger slices.

Yes. I’m totally pitting the cherry with a paper clip half unfolded. And yes. It does work! Joe(y) found that tip online (via Martha Stewart, of course).

Now, we haven’t actually been able to try the finished cherries yet. They need to macerate and absorb the flavors (and alcohol!) for at least a week. However, since we canned them in glass jars the proper way, these delicious cherries should last months in the fridge/pantry.

I snuck a taste of the syrup/bourbon/cherry/awesome concoction and, um, it was pretty freaking delicious. I can only imagine that the finished product is going to taste 5 billion times better. If that’s even possible.

These are going to make great gifts to friends and family for the holidays. It was also a fun way to spend an evening at home with Joe(y). We took turns between photographing and food prep and created something pretty awesome. Enjoy!

To do this, you’ll need:

  • 1 1/2 pounds of fresh cherries
  • A bottle of your most favorite bourbon and/or whiskey
  • 3 cups of sugar
  • 2 cups of water
  • Small to medium piece of ginger root
  • One orange
  • Whole cloves

Wash the cherries in water and then pit via the method above. Prepare the mulling flavors by piercing orange peel with whole cloves. Slice fresh ginger into round chunks, each about a half inch thick. Set aside.

In a pot, bring 2 cups of water and 1 cup of sugar to a boil. When the sugar dissolves, add in the orange peel, cloves and ginger. Lower hear and let simmer for five minutes, stirring occasionally. Strain the syrup through a strainer to remove cloves, ginger and orange peel.  Return liquid to heat and return to a boil.

Add in one cup of cherries. Leave in for about 2 minutes to allow them to blanch. Remove with a hand strainer and set aside while repeating until all of the cherries have gone through this process.

Save about a cup of the syrup and add to it 2 cups of sugar. Bring to a boil, again allowing the sugar to dissolve. Then, remove from heat and let cool slightly. Add in about three cups of bourbon. Mix well. Fill jars with cherries and cover with whiskey/syrup mixture.

Seal. Wait. (Like, at least a few weeks.). Love.

Depending on how properly you can these, they will last for several months if stored properly.

Wooden Carpenter’s Ruler Stars As Holiday Decorations

11 Dec

So, you’ve seen those wooden carpenter’s rulers that fold up? You know those turn into stars you can use to decorate for Christmas, right? I’m pretty sure that’s what their intended use is.

They’re cheap to buy and easy to shape. They come in white, yellow or natural wood colors.

You can hang them on your walls. On your door. On your tree. In your window. (Are you getting the idea here?) Continue reading

How to build a raised garden bed.

25 Sep

So sometimes I get an idea and start a project. And then sometimes I don’t follow it all the way through. This is one of those times.

Not to say that I didn’t accomplish anything, because making this raised garden bed from a pile of wood and some nails felt pretty good. Just because I didn’t actually fill it with dirt or a garden after installing it doesn’t necessarily make it a failure, it just makes it a work in progress.

Continue reading