Archive | DIY RSS feed for this section

Winter Treats: Make your own Candied Ginger

16 Feb

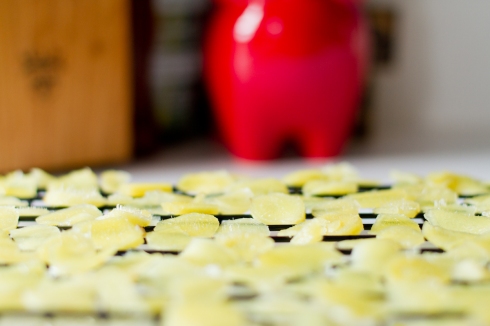
CGleadTurns out, making candied ginger is really easy. And much cheaper to make on your own as opposed to buying a small package in the store.  Plus, once you make your own, you’ll have a long lasting supply of candied ginger that you can access at home, at the office, in the car…wherever!

I was never a hardcore fan of the store bought variety. I actually don’t think I’ve ever purchased a package of my own. But there was a quality about the flavor and the small, sugary slivers that I did enjoy. So that is what lead me to making my own.

CG-4

CG-6

The process is pretty simple. If you can boil water, you can make these candied ginger treats!

CG-8

Ingredients:

  • Ginger Root (As much or as little as you’d like to make)
  • Sugar
  • Water

To make:

  1. Peel the outside layer of the ginger root off using the concave side of a spoon
  2. Slice ginger root into thin rounds
  3. Bring equal parts water and sugar to boil and add in the sliced ginger root. Lower the heat and let simmer for about 30 minutes
  4. Strain ginger from liquid. 
  5. Place sliced ginger on baking rack and let dry for at least 5 hours
  6. Toss ginger slices in a bowl with sugar
  7. Enjoy

Easy To Make (and eat) Peanut Sauce.

30 Apr

As a teenager, I spent most of my free time hanging around Harvard Square in Cambridge. You could find me either sitting in “the Pit” with friends or browsing about the stores at The Garage for music, apparel and random accessories to add to my wardrobe.

You could also find me at the Thai restaurant around the corner. I don’t remember the name of it (but they definitely knew me and my friends’ names). It has long since closed. But I know that is where my love of peanut sauce began. And my taste buds will forever be thankful.

I will admit to putting peanut sauce on anything that is edible. Pasta. Cheese (with or without crackers). Vegetables. Chicken. Hamburgers. Rice. It really does work with (almost) anything. Even on ice cream? I’ve never tried, but I can totally see it working out for you. Continue reading

The Cold and Lovely Pledge Campaign

15 Mar

Ten months ago I brought my first interview to this little piece of the web. It was with the newly formed band The Cold and Lovely, featuring Nicole Fiorentino (of Smashing Pumpkins) and Meghan Toohey (formerly of The So and So’s).

Since then, the duo added drummer Patty Schemel (formerly of Hole) to the mix, and the music has been flowing out of their instruments ever since.

Photo by Andrea Alseri


The band is at 97% of their goal towards making a new album via their Pledge Music site with 6 days left to pledge. I have no doubt they will be reaching that goal shortly, as long as some more music lovers make their way over right now!

Aside from the usual albums, t-shirts and posters most bands offer up, The Cold and Lovely have some other pretty great things. Nicole’s guitar used on tour with Smashing Pumpkins and Veruca Salt. You can write a song with Meghan or have her produce one of your own. How about an autographed set of drumsticks from Patty Schemel? There are plenty more items available as well, so check it out!

You’ll be hearing a lot more from this band in the future, and it would be awesome to say you were part of making that possible, wouldn’t it?

Letterpress Weekend Course: Day 2

26 Feb

Today was the second and final day of my weekend letterpress course. Remember how much in love with it I was yesterday? I still feel that way. And will definitely be investing in one of these machines (albeit most likely a much smaller one) in the not too distant future.

The machine we used today to print our designs was a Chandler and Price machine manufactured in 1902. It uses nothing but the power of your own arms and legs. It’s a workout and a creative design session all in one.

The creative part came to me a little too late however. I had no idea what to make. I was over-thinking it all weekend to the point where my mind could not decide on anything. Business cards? Greeting cards? Coasters? As I was gathering materials this morning, I still had no clue. Joe(y) had suggested I make recipe cards, so that’s what I did, sort of.

I made the design. It was a half-postcard half-recipe card hybrid, apparently. I enjoyed having to put everything in reverse. Where the top is at the bottom and the left is on the right. It fits in with my day job quite well as I view reversed images all day long. My brain easily adjusted to this part.

Next, I set the locked frame into the machine and applied the ink color that I had mixed together.

Once the machine had been set and inked, the actual printing process was quite speedy. I realized I probably should have made my form a bit smaller, and not the exact measurements of the size paper I would be using. I know better than that. I just wasn’t thinking.

In turn, I lost one of the lines I set in the process in order to be sure everything else fit it.

While I am not quite sure what exactly I made today, I love that I made something and understand how it all works now.

I have been wanting to learn this craft for a long time now, and have finally done just that. I’ll most likely be going back for open studio time in the near future, this time with an actual design and project in place.

Letterpress Weekend Course: Day 1

25 Feb

Today was the first of my two day crash course on learning how to set and operate a letterpress machine and type. I am incredibly in love.

I have wanted to take a course like this for several years now. I was always either too busy with actual classes that lead to a degree or I would have just missed a deadline whenever the idea popped back into my mind. This year, however, I was determined.

I found the course being offered at a local art school – Montserrat College of Art – and eagerly awaited registering and paying as soon as I could.

Today we learned the basics. How to set type correctly, how to use the machines, how to care for all the materials, techniques, etc. Our instructor was very friendly and insanely knowledgeable about all things letterpress – as well as lots of other things too!

The group of six in the class we all given a topic and asked to set type based on the theme. Our instructor showed us one from a previous class for which the topic was “food”. I wished that was today’s topic (If you’re new to this here blog, just take a look around, you’ll see why). Instead, we got “Myths”. Fine. I’ll work with it.

After setting my type (see the above pic – I apologize for the quality, I didn’t think to bring my actual camera today) we all then put our random thoughts and ideas regarding myths together. The press we used for this project was a Vanderbilt 219.

The final result:

I did the last line “SHE SANG THEM to THEIR DEATHS”. For some reason the only myth I could remember for the life of me was that of the Sirens in Greek mythology. I was super excited to have found little lobsters though. I love lobster.

Tomorrow I’m not sure what I’ll make. Most likely I’ll make some cards to send out. We’ll see what I come up with I guess…

Vinyl Devotion.

4 Feb

I feel weird posting a blog that does not revolve around foodage. What the what? When did this become a food blog?

Sometimes I do think about things other than food. This is one of those times.

I got this lovely piece of equipment at a yard sale back in 2002. I spent $25 dollars on it. Twenty-five. It’s a Morse/Electrophonic AM/FM radio, 8-Track player and record player. It came with about 18 8-track tapes as well. (Including an Elvis Christmas, Heart, Billy Joel, Carl Perkins, and the B-52’s, amongst others).

It lights up to the beat when you play music. Or talk radio. Or NPR.

Ever had an audio/visual experience while listening to Prairie Home Companion? It’s not that exciting. I should probably stick to putting the lights on only when there are strictly songs playing. I’ll work on that. Continue reading

Wedding Gift: Customized Wooden Cutting Board.

2 Jan

Right before Christmas I received a package in the mail. To my surprise, it was not a Christmas present at all, but a wedding gift. And it was a pretty freaking great one at that.

My cousin Michael and his lovely wife Denise (I’m guessing it was mainly Denise who did the work here) sent a customized wooden cutting board to us as our wedding present. It has my newly hyphenated name and the year of the wedding etched into the wood.

It is really an incredible gift for someone who loves to be in the kitchen as much as I do. I have gotten over my reluctance to use the board (for fear of damaging it in any way) and baked up a nice treat with it that I’m going to share as my next blog post. I really am kind of in love with this as a gift idea!

Bourbon Soaked Cherries.

14 Dec

Last weekend while Joe(y) and I were away for the weekend visiting Provincetown, we stopped in for an early dinner and some drinks at one of my favorite places to eat. In addition to ordering dozens of oysters and a Pale Ale for myself, Joe(y) ordered an Old Fashioned. The waitress apologized that they no longer had the bourbon soaked cherries for the Old Fashioneds, and that they only had the regular maraschino cherries.

Wait. Back up. BOURBON SOAKED CHERRIES? Yes.

So. Of course. We then decided it was necessary to make our own. Somehow, there were fresh organic cherries for sale in December where we get our produce. We found a basic recipe online on how to preserve cherries whole in sugar syrup. But we can do better than just bourbon infused cherries. We expanded on the idea by including bourbon, cloves, orange peels and fresh ginger slices.

Yes. I’m totally pitting the cherry with a paper clip half unfolded. And yes. It does work! Joe(y) found that tip online (via Martha Stewart, of course).

Now, we haven’t actually been able to try the finished cherries yet. They need to macerate and absorb the flavors (and alcohol!) for at least a week. However, since we canned them in glass jars the proper way, these delicious cherries should last months in the fridge/pantry.

I snuck a taste of the syrup/bourbon/cherry/awesome concoction and, um, it was pretty freaking delicious. I can only imagine that the finished product is going to taste 5 billion times better. If that’s even possible.

These are going to make great gifts to friends and family for the holidays. It was also a fun way to spend an evening at home with Joe(y). We took turns between photographing and food prep and created something pretty awesome. Enjoy!

To do this, you’ll need:

  • 1 1/2 pounds of fresh cherries
  • A bottle of your most favorite bourbon and/or whiskey
  • 3 cups of sugar
  • 2 cups of water
  • Small to medium piece of ginger root
  • One orange
  • Whole cloves

Wash the cherries in water and then pit via the method above. Prepare the mulling flavors by piercing orange peel with whole cloves. Slice fresh ginger into round chunks, each about a half inch thick. Set aside.

In a pot, bring 2 cups of water and 1 cup of sugar to a boil. When the sugar dissolves, add in the orange peel, cloves and ginger. Lower hear and let simmer for five minutes, stirring occasionally. Strain the syrup through a strainer to remove cloves, ginger and orange peel.  Return liquid to heat and return to a boil.

Add in one cup of cherries. Leave in for about 2 minutes to allow them to blanch. Remove with a hand strainer and set aside while repeating until all of the cherries have gone through this process.

Save about a cup of the syrup and add to it 2 cups of sugar. Bring to a boil, again allowing the sugar to dissolve. Then, remove from heat and let cool slightly. Add in about three cups of bourbon. Mix well. Fill jars with cherries and cover with whiskey/syrup mixture.

Seal. Wait. (Like, at least a few weeks.). Love.

Depending on how properly you can these, they will last for several months if stored properly.

Wooden Carpenter’s Ruler Stars As Holiday Decorations

11 Dec

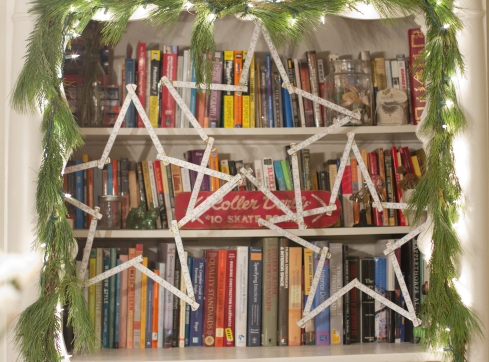
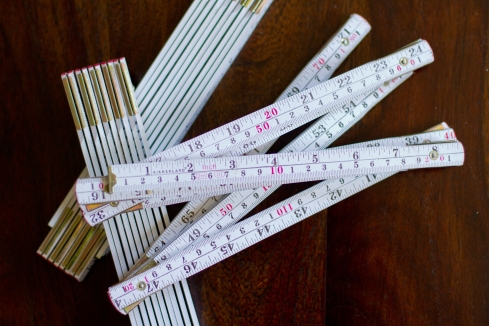
So, you’ve seen those wooden carpenter’s rulers that fold up? You know those turn into stars you can use to decorate for Christmas, right? I’m pretty sure that’s what their intended use is.

They’re cheap to buy and easy to shape. They come in white, yellow or natural wood colors.

You can hang them on your walls. On your door. On your tree. In your window. (Are you getting the idea here?) Continue reading