Chestnut Stuffed Mushrooms (and holiday gift ideas!)

11 Dec

Chestnut-6

My most recent post for Eat Boutique focuses on using chestnuts as the main ingredient in a filling and seasonally mouth-watering stuffed mushroom. 

Over the past few weeks the air in New England has been changing. It’s a familiar feel that brings an open-arm embrace to sweaters and hooded sweatshirts while at the same time an outstretched grasp hoping to cling to a few more days of warm weather. Fireplaces begin to smoke and the scent of burning wood while working out in the yard brings about a certain hunger. Thoughts of consuming recipes composed of  heartier elements than most that I have eaten over the past few months begin to invade my cravings.

The seasonal changes of fall bring about the recollection of roasting chestnuts in the fireplace while growing up. The uniquely brown nuts marked with an “X” pattern would line the outer tiles of the fireplace hearth, slowly roasting until their aroma filled the room. My family would eat them together as soon as they were cool enough to peel, but we had never used them in a recipe.

Chestnut-5Recently, while consulting with my hunger, I sensed that these hard-shelled delights might work well in a stuffed mushroom. I combined the fresh chestnuts with local leeks and hand-picked apples from a local orchard, then added some Manchego cheese to round out the flavors…

Chestnut-4

To read more and to get the recipe, head on over to Eat Boutique! While you’re there, check out the gift boxes and individual items in the shop! I had the chance to sample (and purchase!) many of the items available at the Eat Boutique Holiday Market in Boston this past Sunday. The items and packages you will find easily make perfect gifts for someone on your list (or treat yourself!). 

My favorites include the Mexican Chocolate Almonds from Q’s Nuts (made right in my neighborhood!), Donovan’s Cellar Ginger Spiced Beets and for someone special, the Joy the Baker Gift Box which comes with Sweet Brook Farm Maple Syrup,  Sweet Revolution Caramels and a 14-oz bag of Marge Granola – oh, and a signed copy of Joy Wilson‘s cook book!

Aside

December!

9 Dec

I have not forgotten about this blog. I have just been slammed by so much life lately! All good. We will continue with our regularly scheduled progamming shortly…

Until then, here are some holiday mercury glass decorations on my table….

Image

A picture of the albino squirrel who lives near me and came to visit this morning…

Image

And a shot from taking a friend on a “The Town” tour through Boston, because that’s what she really wanted to do…

Image

A real blog post will be forthcoming in the near future. That’s the plan at least…

A new endeavor…

22 Oct

I am excited to announce that my first post writing and photographing for Eat Boutique, an online magazine and market,  is up! I truly admire the aesthetics and ideas behind what they have accomplished, and I am honored to be a part of it, in whatever small way I am able.  I urge you to go check out eveything they have put together over the past several years.

Below is an excerpt from my first contribution on how to make a delicious and filling veggie taco (Hint: Fried Green Tomatoes).

“Being a carnivore married to a vegetarian can sometimes be a challenging adventure. Over the past ten years I have been enlisted as a vegetarian-by-default at many a meal. During this time, however, I have grown to appreciate plant-based foods in ways that still surprise me. Using vegetables in unexpected places to fill the void in a meatless marriage has become a skill I am still honing, but there are those moments when a vegetable dish leaves me completely satiated.

Vegetarian tacos have been a recurring presence in my kitchen and typically involve a frozen meat substitute defrosted and flavored with a taco seasoning packet – and a lot of cheese. This dish, however, has none of the previously mentioned vegetarian taco curses. Using the leftover green tomatoes gathered from my garden right before the first frost settled in, I refocused the vegetarian taco into an exciting, fresh and multi-layered delight.”

Click here to read the rest of this post and to view images of how beautiful this dish is….

Peanut Sauce Blue Cheese Burger & Friend.

24 Sep

I was craving a bunch of things to eat this evening when I got in from work. I decided to put them all onto burgers and combine the goodness into some seriously flavorful bites. 

I found my favorite peanut sauce at the store the other day and have been dying to put it on something, anything, since I picked it up. I also wanted cheese. I haven’t had any since Saturday. This is a huge deal. 

Instead of dipping the cheese into the peanut sauce and satisfying my desires while at the same time ignoring thousands of years of evolution, I thought it might be nice to be civilized and eat a proper meal. Hence my burger idea. 

I mixed the meat with some garlic, fresh herbs, salt and pepper and grilled. Then took two routes.

Burger One: Apple (fresh picked at the orchard yesterday!) and Brie.

Burger Two: Blue Cheese (Bleu d’Auvergne), Onion, Peanut Sauce. 

I started out eating the peanut sauce burger first. Then switched to the brie and apple. There was some intense flavor action going on between the two as they fought for dominance over my tastebuds. They kind of complimented each other though. And I am happily satiated because of it.  

Stitch by KMIDesign – Cambridge, MA

9 Sep

Here’s a post about one of my favorite Massachusetts designers Kate Maloney Interiors (written/photographed by my favorite person!). Check out Kate’s storefront, Stitch, in Cambridge, Ma and see all of the uniquely awesome items she’s picked up to pass on to you!

Joe And Sometimes (y)

Image

Ever look at a shelter magazine or blog and see spaces that look frigid and sterile? You sit and wonder, “Does someone actually live there? Ok, clearly these people don’t have kids or pets or personalities.”  Well if that is your impression of what high-end interior design looks like, look again.

Cambridge based Kate Maloney Interiors creates gorgeous spaces that are meant to be lived in by the whole family.  Kate and her team infuse each project with a quirky mix of pattern, color and texture.  Though usually not one for labels,  Kate’s style could possibly be coined as, “Cantabridgian Chic” or perhaps “Boho Modern.” Whatever the label you come up with, each home is always a great balance of the old and new; creating spaces that are timeless, stylish and always functional.

Established in 2003, Kate’s design office recently expanded to include a new retail venture called Stitch. “After…

View original post 167 more words

Bantam Cider Company

8 Sep

Thirsty? Check out Bantam Cider Company from Massachusetts. A local company using nearby orchards to make their deliciously flavorful cider. I wrote a bit about them, here’s an excerpt:

 The company chose their name because “the word bantam means small and mighty. When we were looking for a name, we wanted something that was a metaphor for our home market of Boston and at the same time, would embody our company – which is a small cider company in a sea of very large beverage brands.” explains Michelle da Silva of Bantam.

Bantam Cider Company’s first endeavor is a cider they have named “Wunderkind”. The name is in honor of one of the greatest modern adventurers, Amelia Earhart, who just happens to have local ties as well.

At the moment, Bantam is concentrating their energy on creating a variety of ciders. The company hopes to focus on cider in a way that people begin to reshape the way they experience it. Bantam has been experimenting with several new ideas, including a heavier farmhouse style cider and one with some accents of other fruits and spices…

…With autumn fast approaching, Bantam Cider Company will be starting up production again in late September/early October. At that time, apples fresh from central and western Massachusetts vineyards will be pressed for sweet cider. Bantam then adds yeast and ferments the cider in stainless steel tanks. Once ready, the cider is then blended to create the final product.

You can read the rest at the Boston Local Food Festival blog!

Boston Local Food Festival

11 Aug

On Sunday October 7th, 2012, the Rose Kennedy Greenway will host the 3rd annual Boston Local Food Festival. The festival is a celebration of local food, local farms, local businesses and more. There will be plenty of music, samples and activities all day long. In addition, there will also the the Local Craft Brew fest on October 5th featuring some of the best local breweries around!

I am excited to be blogging for this event, getting to know some of the sponsors and participants while at the same time sharing information with you all! The first company I got to know a bit better was Olivia’s Organics. You can my article about them on the Boston Local Food Festival blog.

Stay tuned for more with some of the festivals sponsors and participants!

Fresh Fried Eggplant Slices

8 Aug

So I was very excited to find that the first thing ripe and ready to eat from my garden was an eggplant. I had never grown an eggplant before, and it seems to require little attention and maintenance to get to the eating stage.

I cut this little gem off from the stem with much excitement. While I have plenty of recipes in my mind that I am going to utilize eggplant for, having just one small eggplant limits the extent to which I can carry through on those ideas at the moment. 

So, with it being the middle of a lazy Saturday afternoon, I glanced around my kitchen and decided I had the ingredients for frying up some eggplant slices. First thing I did was cut the eggplant into about 1/4 ” slices and pressed them while I got everything together.

The Italian in me knows that the best way to prepare eggplant like this is to salt the slices and press out the excess moisture – and if you listen to my mom who listened to her mom who listened to her mom, it’s best to prepare ahead of time and leave overnight if you can.  But, in real life, when I just want to eat fresh food by frying it up in oil, twenty minutes will totally suffice.

Once the eggplant is pressed, coat with fresh breadcrumbs (or, if you’re like me, use the can you found in the back of the pantry shelf that was probably opened three years ago and is 3/4 empty…either way works.) Then…fry it up!

Drain the eggplant as it comes out of the pan and set it aside while you cook up the rest. Plate and serve with a fresh tomato sauce (or, again, follow the path of the breadcrumbs…) and eat it all in under five minutes while sitting on the couch catching up with your DVR. Or, you know, you can serve it to friends/family in a civilized manner if that’s your thing.

To Make:

Ingredients:

  • 1 Eggplant sliced into 1/4″ pieces (or more than one, depending on how many servings you’d like)
  • Oil (enough for frying, heated in skillet/pan)
  • Breadcrumbs (1 cup)
  • Pasta Sauce (or other dippy yumminess)
  • 1-2 eggs heated

Recipe:

Dip eggplant into eggs and then coat on both sides with breadcrumbs. Place into hot oil and cook until browned on each side. Place cooked eggplant on paper towels to drain excess oil off. Repeat process until all all cooked. 

Plate and serve with sauce.

Fast And Easy Falafel Lentil Loaf.

9 Jul

Yeah, this recipe does have a lot of letter “L’s” in it. Rest assured, they will all stand for “love” once  you taste this dish. This has been a staple dinner recipe in my home for quite a while, for a few reasons:

  1. It’s simple to make.
  2. It’s inexpensive.
  3. There are always leftovers to enjoy the next day.
  4. It’s healthy.
  5. It’s filling.

The ingredients are most likely things you’ll have around your kitchen anyway. I always check to make sure I have the basic components (canned lentils, jarred roasted red peppers, falafel mix) in the pantry at all times.

It’s really great on those nights when reality hits. Those times you barely got yourself home from work and somehow forgot that you still need food before the evening is through. (It’s also really great on those nights when you plan ahead for it, too.)

Basically, you throw the seven ingredients in a bowl. Form that mixture into a loaf and put it in the oven. Wait a short while and dinner is served! It’s not hard. It’s super easy food for times when life is hard/annoying/too fast. 

How To Make:

(serves up to 4)

Ingredients:

  • 6 ounces crumbled feta cheese
  • 6 ounces falafel mix
  • 1 can lentils, rinsed
  • 1 small red onion, chopped
  • 2 cups of chopped baby spinach
  • 1 12-ounce(ish) jar roasted red peppers, cut to 1/2″ pieces. Reserve 2 Tbs. of liquid from jar.
  • 2 eggs
Recipe:
 
Combine all of the ingredients in a bowl, including the 2 tbs of liquid from pepper jar. Mix well.
 
Form into a loaf on baking sheet with aluminum foil or other non-stick layer.
 
Bake in preheated oven set at 375° for 35-40 minutes. 
 
Eat on its own, or combine with a fresh vegetable or other side dish. This also goes really great with this easy to make peanut sauce recipe!


Make a Gooseberry Smoothie.

7 Jul

For some reason, this past week has seen me and smoothies having a serious love affair. I’ve been loading them with strawberries and kale and raspberries and blueberries and anything else I could find fresh. When the produce available at my local grocery store wasn’t cutting it, I ventured on over to my local farmers’ market. There were plenty of vegetables and fruit to choose from. Looking around, I was drawn in by the large, oddly shaped gooseberries. They look like a grape, but at the same time, not at all. 

I remember tasting one last year and enjoying it, but didn’t buy any at the time. They are often used for baking and are featured in pies and other desserts. They are also used to make beverages such as wine and tea. And smoothies.


Now, I wasn’t quite sure what to combine with the gooseberries, but something told me mango. So I did that. And some fresh blueberries. And honey. I added in some frozen peach slices as well for temperature control (I also used some frozen vanilla yogurt for this). A splash of vanilla flavored almond milk to round out the liquid portion and…

It was pretty darn refreshing! And apparently also very energizing, as after having one I went on a six mile walk. For real. 

Recipe…

Ingredients:

  • 1 cup of whole gooseberries
  • 1/2 cup blueberries
  • 3 frozen peach slices
  • 1/2 mango, cut up
  • 1/2 cup vanilla almond milk
  • 3/4 cup frozen vanilla yogurt
  • 2 Tbs raw honey

To make:

Add all of the ingredients into a blender. Turn the blender on. Mix into a smoothie. Drink. (I know. It’s incredibly hard to make.)

Will make about 2 cups worth of liquid smoothie goodness.

Avocado, Corn & Asparagus Salad

3 Jul

A few weekends ago I had the opportunity to spend the day on Cape Cod with my pal Molly and our beaus. The day consisted of walking to the beach, swimming in the pool, laying in the sun and eating food. Lovely summer food. 

I stole a recipe from that day and you’re about to read about it below. It was a fresh and brightly flavored succotash/salad. Local picked corn, purple asparagus, avocado, tomatoes, peppers, lime and herbs. Simple. And simply delicious. It is a perfect dish to bring to any Fourth of July cookout.

I couldn’t find any purple asparagus when I made this for a family gathering, but I think I was the only one who cared about this. I put the corn, peppers and asparagus on the grill. While those were cooking I picked fresh herbs from the herb garden and cut up the avocado and cherry tomatoes.  Once everything was ready I combined all together to make a filling side dish. Continue reading

Pile It Up.

26 Jun

Here’s a shot I took while cooking the grits for Boston Bacon Takedown. This is about seven pounds of bacon. All of it was delicious.  

Cheesy Bacon Jalapeno Grits, Deviled Egg Style.

25 Jun

This weekend one of my best friends (Shari!) and I took part in the Boston Bacon Takedown. Twenty home cooks creating dishes all using bacon fifteen pounds of free bacon. Last year the two of us were so impressed by all of the entrants, we decided that the following year we would give it a go. And we kept our word.

We decided to go the savory route instead of the sweet route. Last year the sweets just were a little too much, and there was an overload of maple accompaniments which after two or three recipes using the same groundwork became just a bit too much to enjoy. And we were blown away by last year’s winner who made an asian inspired taco that was insane.

Our entry? Cheesy bacon jalapeño grits, served deviled egg style. Topped with bacon, of course. The concept came to me and I thought it was a pretty safe bet. After boiling and peeling FOURTEEN DOZEN eggs, I was having second thoughts. At this point, however, my thumb was barely intact from being impaled by egg shell and it was too late to turn back.

The grits portion was a mad science experiment that actually succeeded. We started with 36 cups of liquid, boiled it, and added 72 ounces of grits. Once that thickened up, we added Gruyere cheese. And then we added some cheddar cheese. And then we added some more cheese. From there on in, it was anyone’s guess how this thing was going to turn out. It took about forty minutes for us to tweek it to perfection.

All totaled, we put in about 6 decent sized jalapeños. Somewhere around 8 tablespoons of Sriracha red chili paste. About a cup of lemon juice. Six pounds of bacon cooked and put through a food processor. A few cloves of garlic. Some dijon mustard. Some melted bacon lard.   And of course salt and pepper to taste.

WHAT!?! It worked. It was delicious.

While we didn’t win (first place went to a caramel bacon candy – sweet won this year, who would’ve guessed?!) My favorites this year included the bacon corn dog and the bacon wrapped blue cheese meat balls.

We also came home with a few parting gifts from Le Creuset, which is never ever a bad thing.

Now, does anyone know how to remove the smell of fifteen pounds of cooked bacon from one’s home?

Recipe:

Okay. Let me be real here. I have no idea what quantity of anything was used. All I can say about this is start out with some grits in a pan. Then, add in cheese until it suits your taste. Add in a decent amount of cooked bacon cut up in a food processor (or chopped…). Then, add in pepper/garlic/dijon mustard puree, salt, pepper and sriracha until it starts to taste awesome. Then, add lemon juice! (This was Shari’s tip and it made a HUGE difference. The Greek in me should have known this. The Greek in Shari did.) Finesse until you are blown away. Eat plain or stuff into a hard boiled egg. 

The Benefits Of Local Raw Honey.

19 Jun

Okay. So maybe I took a break from this blog. It wasn’t that we weren’t getting along…things just got busy. You know how it goes. Out of nowhere you become occupied with everything at once and before you know it, five weeks have gone by without any contact. It’s okay. We’ve reconnected, and we’re still pals. 

Here’s an article of mine published today on the True Food Movement website. I talk about the benefits of local honey and the downfalls of all that other stuff claiming to be honey you find on grocery store shelves.

Here’s a look…

 …A list of contaminants found in store-bought honey can be obtained by doing a quick internet search, but suffice to say, you don’t want antibiotics or lead with your cup of tea. Those are ingredients that were found in one quarter of Asian honey inspected in 2009, the kind most commonly found in your grocery aisle.

For that reason alone, local honey is the superior choice, but there are plenty more. When you purchase regionally-produced honey, you support your local economy while also creating a greater community for yourself and your neighbors…

Go read the rest at True Food Movement!

Radio Flyer Herb Garden.

9 May

I found this old Radio Flyer wagon while driving down the street one day. Someone had put it out with the weekly trash to be picked up and destroyed. I couldn’t have that. I love old things too much, and my car had plenty of room to fit it.

The wagon has sat in my basement for a good three years, holding random boxes of tools and supplies in the workroom. However, this weekend while in New Hampshire I found a great little nursery with tons of annuals, perennials, vegetables and herbs. Each pot of herbs and veggies only cost $2.99. I couldn’t resist buying some.

Last year I had a couple of potted herbs sitting on the patio. This year, I now have a few more to add. I wanted them in one central location, out of the way, but easy to access for cooking. I saw the old wagon in the basement and decided it would be repurposed as the home of the herb garden.

It’s in a spot that gets a decent amount of sun, but with the wagon, I can easily move it to other parts of the patio if I think the herbs could benefit from even more sun. Once the herbs start to really grow, they should fill the wagon in nicely.

What did I plant?

  • Basil (a must-have for any garden)
  • Cilantro (for taco night and guacamole)
  • Pineapple Mint (for Mojitos to accompany whatever I use cilantro for)
  • Oregano (basic herb, but great fresh flavor)
  • Lavender (for cookies, butter, homemade cleaning products, etc)
  • Thyme (This survived the mild winter we had and never really lost leaves from last year’s growing season)

I ended up placing an extra solar yard light I had into one of the potted herb plants. It will add a little more to the evening atmosphere of the yard and patio. I also had some room to place a small watering can in the wagon as well, so that I can use the rain water it captures to hydrate the plants when they need it. Another thing to note…I drilled a few holes into the bottom of the wagon to drain any excess rain water. This will prevent your herbs from being overwatered if there are holes in the bottom of the pots that are used.

And I also was able to finally fill the raised garden bed I built last year (Post: How To Build A Raised Garden Bed). I’m looking forward to filling that with vegetables and updating their progress here.

How To Cook Fiddleheads.

7 May

Years ago while in college, I worked part time at a local Whole Foods. In that time, I learned a surprising amount about produce. I did not know there were so many edible items that grew from the earth. Fiddleheads, I believe, fit into that grouping.

I have to say, upon first glance, they can look as though someone made a mistake and inadvertently stocked the shelf with an imported species of centipede. That is not the case however. Besides, you want them to look all curled up and tight like they are hiding from you. That’s how you know they are safe to eat. (Once they lose the tight curl, they can make you sick.)

Now that I’ve scared you off from ever making these at home by comparing them to bugs and telling you they will make you ill, let me tell you about how I made them (and ate them!) in my kitchen.

Fiddleheads before cleaning

First, like I stated above, be sure the fiddleheads you are cooking with are tightly curled. Next, you will want to cut off the very tips of what is left of the stem. They tend to brown a little while hanging around at the produce section (think of it as a tan!). Chop it off, it makes for better aesthetics.

Once you’ve cut off the ends, wash the fiddleheads in a bowl of cold water. Get rid of any orange-brown leaves and/or dirt. I’d do this about three times, or until the water you’re draining out doesn’t have a lot of pieces floating around in it. After they are rinsed, you should boil them for about 10 minutes in water.

Add the fiddleheads, garlic, salt and butter in a pan and sauté until done to your liking. Plate, add some lemon on top and enjoy!

Ingredients:

  • Fiddleheads
  • 2-3 cloves garlic
  • 1-2 tbs. butter
  • salt to taste
  • lemon

To make:

Cut and clean the fiddleheads as mentioned above.

Boil cleaned fiddleheads in a pot of water for about 10 minutes. Next, strain from water and add into pan/skillet with garlic, salt and butter. (I’m sure adding bacon here wouldn’t be a bad idea either…)

Sauté until done. Enjoy with your meal by adding on some fresh squeezed lemon juice!

Easy To Make (and eat) Peanut Sauce.

30 Apr

As a teenager, I spent most of my free time hanging around Harvard Square in Cambridge. You could find me either sitting in “the Pit” with friends or browsing about the stores at The Garage for music, apparel and random accessories to add to my wardrobe.

You could also find me at the Thai restaurant around the corner. I don’t remember the name of it (but they definitely knew me and my friends’ names). It has long since closed. But I know that is where my love of peanut sauce began. And my taste buds will forever be thankful.

I will admit to putting peanut sauce on anything that is edible. Pasta. Cheese (with or without crackers). Vegetables. Chicken. Hamburgers. Rice. It really does work with (almost) anything. Even on ice cream? I’ve never tried, but I can totally see it working out for you. Continue reading

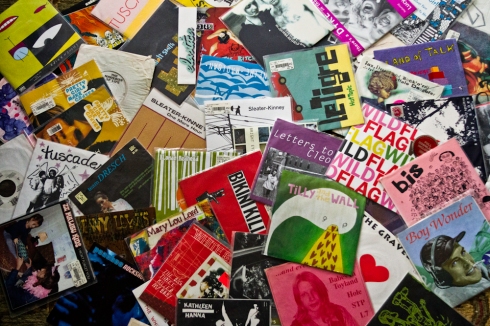
Happy Record Store Day!

21 Apr


                                            A snapshot of part of my collection

Today is record store day. A day to go out and support all of the small independent record shops around your town. I have to say, it’s been a while since I’ve actually gone out and purchased some vinyl. Ever since Record Hog in Cambridge closed, I just haven’t really found a shop that I loved to hang out at browsing as much as that one. There was always someone I knew looking around for records. And the cats! How awesome were those cats? I do have that shop to thank for a good majority of my collection though, and am thankful to have had it around as long as it was.

So, in no particular order, here are a few gems I can remember buying at record stores over the years that when I found them gave me the feeling only good music can:

  • The Gravel Pit – “Standing in My Way” and “Something’s Growing Inside”
  • There’s a DYKE in the Pit feat. Bikini Kill, Tribe 8, Lucy Stoners and 7 Year Bitch
  • Bonfire Madigan – Backseat Buoy
  • Elastica – The Bitch Don’t Work
  • Sleater-Kinney – Get Up 7″; One More Hour 7″
  • this is fort apache. feat. Dinosaur Jr., the Lemonheads, Juliana Hatfield, Buffalo Tom, Radiohead, Come and Throwing Muses.
  • …and everything nice 7″ featuring Babes in Toyland, Hole, STP and L7.
  • Tuscadero – Mt. Pleasant/Nancy Drew; Angel in a half shirt; Mark Robinson remixes
  • Letters to Cleo  – Anchor single
  • bis / Heavenly – split 7″
  • Ze Malibu Kids – Sound It Out

And here are some I remember buying at shows (better than any other means because usually the artist is directly selling you their music = best way to support music ever):

  • Rilo Kiley – The Execution of All Things (signed “bikini kill ! ❤ jenny lewis”)
  • Wild Flag – Glass Tambourine/Future Crimes 7″ (signed by all members)
  • Land of Talk – Speak to Me Bones / Death by Fire 7″ (last copy left)
  • Tilly and the Wall – Sad Sad Song (#301 of 1000)
  • Aly Spaltro (Lady Lamb the Beekeeper) – Sunday Shoes

And yes, there is the internet. And yes, you probably can find the album you want with a few types and clicks. But is that as fulfilling as discovering an album you’ve been longing for stuffed in between dozens of other albums? Of course not. And you’re less likely to stumble across an artist or band you’ve heard in passing or have long forgotten about when you’re looking for one specific title online.

Was I longing for a copy of The Waitresses Wasn’t Tomorrow Wonderful? Not entirely.  Did I need to buy Boom Boom Boom Bingo by Scruffy the Cat? Of course I didn’t. Was my goal for the day to head out and find Saving Grace by Throwing Muses? I don’t think it was. Am I stoked to have purchased full albums by The Cars, Blondie, ’til Tuesday and The Del Fuegos all for just $4.00? Hell yes.

My point? My music collection grew and grew thanks in part to all the records, compact discs and cassette tapes I happened to come across while out browsing music at my local music shops. You should go do that too. Yeah, Amazon and iTunes may be convenient and direct, but go take a couple of hours and spend it sorting through stacks of music. What you find will most likely excite and educate you far more than clicking once to confirm your purchase with Apple.

(This post was originally published on April 16, 2011)
Brooklyn.

15 Apr

Well, it sure is nice to be back on the internet so soon! Although, honestly, I enjoyed the time away. I’ve been home since Wednesday and today is really the first time I’m using the computer. However, being unable to do much else at this stage of recovery, here I am.

Since I haven’t been able to create any new content in the last two weeks or so, let’s travel back to the Saturday before my surgery. Joey and I took the short Boston to NYC drive through patches of rain and snow to spend the day in Brooklyn. I have a love/hate relationship with New York that has been on-going ever since I can remember.

I like that it has everything you could possibly want to eat/see/smell/taste/listen to/feel. I hate it for all of those reasons as well.

We made the trek primarily to attend the book signing of/ have dinner with the lovely Joy Wilson (aka Joy the Baker). The signing was held at The Brooklyn Kitchen (which, I have to say, is a nice all-purpose space). The room was packed, but the beer was free. And there were cookies. And scones. And brownies. Joy gave a brief talk, answered some questions and then started signing for the 250 or so people in attendance.

After having my book signed and finally giving Joy a huge hug, Joey and I took to the streets. We walked. And walked. And walked. All over Williamsburg and Greenpoint. Popping into shops and stores which caught our eye. We got coffee. It rained a little. I took some pictures. Visited old haunts. We were going to use this time to catch up with some friends, but plans changed at the last minute and we were left to our own devices while waiting for dinner.

Upon the suggestion of a friend, we met up for dinner at Enid’s with Joy, her man-friend and two acquaintances of theirs. My dinner consisted of bourbon and catfish. Enough said. It was a delightful time chatting and eating and a great way to spend some of my last few days before being laid up. The drive back right after was pretty smooth, and I think we were home by 12:15 AM.

Coincidentally, while I was writing this post, Joey was in the kitchen making dinner.  I had to take out the camera and start snapping pics, albeit as uncomfortable as it was to bend and get the right angle on the food. A different take on falafel and looks really delicious!  I’m sure I’ll be sharing it soon…

One small year.

3 Apr

It has been exactly one year since my first post on this blog and I’m completely surprised at how it has gone since then. I really had no idea it would be so food centered. I really thought it was going to be more of a design centered blog. No biggie.

I’ve created some pretty tasty recipes and dozens of photos to accompany them (remember the Bourbon Soaked Cherries or the Cheddar and Walnut Stuffed Mushrooms ?!?). I wholeheartedly enjoy the process of documenting what I’ve made as I’m making it. With that in mind, I think I’ll keep this site going on that same path for the future.

I’ve done interviews with some pretty awesome people about projects they are working on, and even made new friends in the process. (I’m talking about you, Joy Wilson.)

It was also an enjoyment to document road trips and vacations. Like that time I fell in love with Maine and the ocean and swimming in a rock quarry and the food and the people and the sleeping nook.

There have even been times where I thought I was crafty and made some things like these:

I’ll be continuing that all in the future, and add more into the mix as well.

With that said, I’ll be out of commission for a bit. I’m going in for heart surgery on Thursday (third times a charm, right?). With that in mind, I’m guessing I won’t be doing too many blog posts in the next two or three weeks. I promise to use the time to think up fun, tasty and aesthetically appealing content. And then I’ll use the remaining time I’m home from work to get all of those ideas posted up on here.

Also, in the next few months, Joey and I will be launching a new site! We have some pretty great ideas (well, at least we think     so) for content. We also have some amazing people on board to contribute, and I can’t wait to get that going for real.

And, since we’re talking openly, I may or may not change the name of this blog. Do we all like the name of this blog? Do I? I have no idea

Anyway, thank you all for reading, friends and strangers alike. You all rock. And I love that you keep coming back for more.

Shortbread Pop Tarts.

25 Mar

Homemade shortbread pop tarts? Uh-huh.

I had been looking for a way to make pop tarts from scratch. The filling was the easy part, the crust is what was perplexing. Recipes I had seen all call for making the crust with pre-made pie crusts. Meh.

Let’s be honest here, pop tarts don’t taste like pie. That’s why Hostess Fruit Pies exist.  So all of those recipes calling for pie crust use in this case are wrong. (Or, at the very least, terribly misguided.) After much consideration, I decided that the best option for crust would be a homemade shortbread crust.

As my friend Shari would say: Holy cats!

The shortbread is sweet and buttery and delicious. I flattened the dough into small rounds, placed some decent quality mixed berry preserve in the middle and topped it with another flattened dough the same size as the one on the bottom. These would definitely make Lorelai Gilmore go nuts – aside from the make it from scratch part.

Slice off the sides to give the pop tart its shape. Then, put in the oven for 20 minutes. Once they’re done, take them out and let cool. Drizzle the icing onto the top and add sugar. It’s really that simple.

Ingredients:

  • 2 cups butter (unsalted)
  • 1 cup dark brown sugar
  • 4 cups flour
  • 1/2 tsp. salt
  • jar mixed berry preserves
  • 2 cups confectioners sugar
  • 1/2 cup milk
  • decorative sugar

Recipe:

Preheat oven to 350°F

Mix together the butter and sugar first. Make sure the butter is room temperature so that it mixes well with the sugar. Once they are mixed, add in the salt and gradually add in the flour.

Next, chill the dough for a few minutes until it is easy to form little pancake like shapes. Put a heaping tablespoon of preserve in the middle and spread around. Cover with another pancake shaped round of the shortbread dough. Trim the sides into a pop tart shape/size.

Once they are formed, put on a greased baking sheet and bake for 20 minutes.

While that cooks, mix together the confectioners sugar and milk. (Add in the milk one tablespoon at a time to be sure the icing doesn’t become too runny.)

Take baked tarts out of the over and put on cooling rack to cool. Drizzle on the icing glaze mixture and top that with decorative sugar.

The Cold and Lovely Pledge Campaign

15 Mar

Ten months ago I brought my first interview to this little piece of the web. It was with the newly formed band The Cold and Lovely, featuring Nicole Fiorentino (of Smashing Pumpkins) and Meghan Toohey (formerly of The So and So’s).

Since then, the duo added drummer Patty Schemel (formerly of Hole) to the mix, and the music has been flowing out of their instruments ever since.

Photo by Andrea Alseri


The band is at 97% of their goal towards making a new album via their Pledge Music site with 6 days left to pledge. I have no doubt they will be reaching that goal shortly, as long as some more music lovers make their way over right now!

Aside from the usual albums, t-shirts and posters most bands offer up, The Cold and Lovely have some other pretty great things. Nicole’s guitar used on tour with Smashing Pumpkins and Veruca Salt. You can write a song with Meghan or have her produce one of your own. How about an autographed set of drumsticks from Patty Schemel? There are plenty more items available as well, so check it out!

You’ll be hearing a lot more from this band in the future, and it would be awesome to say you were part of making that possible, wouldn’t it?

Parsnip & Leek Smash

8 Mar

Parsnips and leeks, you say? Indeed. And with the addition of a little creme fraiche, this turns into a delicious side for any meal.

This is a great substitute for boring mashed potatoes, and though it’s simple to make with just three ingredients, it has a complex flavor that you’ll be craving time and time again. And it’s a pretty healthy dish, too.

Ever since I started adding parsnips into my regular rotation of vegetables, I have not been disappointed. The albino cousin of the carrot doesn’t particularly look like more than just an ordinary root, but it has a nutty flavor that really stands out. I prefer to leave the outer skin of the parsnip on, as it isn’t very thick and adds a nice texture.

These parsnips were given to me at the end of the growing season in late fall and I just now have gotten around to using them. They were grown organically at a local farm and were stored properly for a couple of months, allowing the fresh flavor to last well into winter.

And lest we forget the other main component of this dish, the leek. I find it is another underutilized vegetable with a lot of flavor. It’s related to onion and garlic, and works very well together with the parsnips.

Once the veggies are cut and boiled, put them in a bowl and use a potato masher to smash them all together. Add in the creme fraiche, salt and pepper and plate next to your main dish.

To make:

Ingredients:

  • 3 medium sized leeks, cut into 1/2″ rings
  • 1 pound parsnips, skin on, cut into 1-2″ chunks
  • 1/3 cup creme fraiche
  • salt and pepper to taste

Instructions:

Bring a medium pot of water to a boil, and add parsnips and leeks. Let cook in boiling water until soft, about 15-20 minutes.

Remove from water and place in a medium sized bowl. Smash up the leek and parsnip together until mashed together. Add in creme fraiche, salt and pepper and mash together some more. (You can make this as smooth/chunky as you want, I prefer it somewhere in between.)

Plate and serve. You could garnish with nutmeg or a small dollop of creme fraiche.

Roller Derby #10

7 Mar

Here’s an old photo of an old skateboard I took about two years ago. I really love the color of the board and the worn out nature of the wood.

It sat here on display in my dining room for quite some time, and now resides in the same room, but in a different location.

Classic Deviled Eggs.

6 Mar

A decade ago, if you were having a party, I was bringing the deviled eggs. And yes, if you’re doing the math, a decade ago I was in my very early twenties.

Now, with that admission out of the way, these things were a freaking hit. People could not stuff enough of them into their mouths. And so, I just kept on making them. And everyone wanted more, time and time again. I even bought a deviled egg platter. What? Yes.

I haven’t made these little oval delights in quite some time and have been in the mood for them, so here we are.

Continue reading

Chocolate Hazelnut Orange Cake.

4 Mar

On this particular sunny Sunday, I was supposed to be attending the wedding of my dear friend Meghan in Los Angeles. Two people I could not be happier for are celebrating their marriage outdoors in Elysian Park with a huge party. Instead of spending the day with them and dancing it up with friends and a speckle of celebrity attendees, I am here in New England because things don’t always work according to plan or intention.

However, today is also Molly’s birthday and she will be having a get together later on this evening. So I have that to look forward to. And, since I had the time, I made a cake to bring with me.

I have only made this cake once before for another friend on her birthday years ago. I remember everyone enjoyed it thoroughly, and I felt it was time to get on it again.

It’s not that hard to make and won’t take too long (as long as you aren’t staging photos, finding the right lighting and fighting with the dog because all she wants is to eat everything you are touching.) Oh, and the frosting is made with cheese. Enough said.

Once you have all of your ingredients together, it’s time to get started. Now, for the cake, just get yourself a good quality chocolate cake mix. Unless you want to upstage me and make it from scratch. That’s totally cool.

While the cake is baking, make the crunchy hazelnut caramel toffee. It’s pretty freaking simple. Water and sugar. Boil. Pour. Let set.

Now that the cake is cooling and the toffee is chopped, it’s time to make the frosting. The key to making this correctly is to have the Marscapone cheese at room temperature for mixing. Another thing is to make the whipped cream portion of the frosting first before adding it to the rest of the ingredients.

Once it’s all mixed, spread and even layer on top of the bottom layer of cake and sprinkle that with some of the orange zest/chocolate/sugar mixture.

Next, add the top layer of cake. And more frosting.

Once the chocolate cake is covered with the hazelnut crunch frosting, sprinkle as much of the orange/chocolate/sugar topping as you’d like.

And all of a sudden, you have a cake everyone will LOVE.

To make this cake: Continue reading

Letterpress Weekend Course: Day 2

26 Feb

Today was the second and final day of my weekend letterpress course. Remember how much in love with it I was yesterday? I still feel that way. And will definitely be investing in one of these machines (albeit most likely a much smaller one) in the not too distant future.

The machine we used today to print our designs was a Chandler and Price machine manufactured in 1902. It uses nothing but the power of your own arms and legs. It’s a workout and a creative design session all in one.

The creative part came to me a little too late however. I had no idea what to make. I was over-thinking it all weekend to the point where my mind could not decide on anything. Business cards? Greeting cards? Coasters? As I was gathering materials this morning, I still had no clue. Joe(y) had suggested I make recipe cards, so that’s what I did, sort of.

I made the design. It was a half-postcard half-recipe card hybrid, apparently. I enjoyed having to put everything in reverse. Where the top is at the bottom and the left is on the right. It fits in with my day job quite well as I view reversed images all day long. My brain easily adjusted to this part.

Next, I set the locked frame into the machine and applied the ink color that I had mixed together.

Once the machine had been set and inked, the actual printing process was quite speedy. I realized I probably should have made my form a bit smaller, and not the exact measurements of the size paper I would be using. I know better than that. I just wasn’t thinking.

In turn, I lost one of the lines I set in the process in order to be sure everything else fit it.

While I am not quite sure what exactly I made today, I love that I made something and understand how it all works now.

I have been wanting to learn this craft for a long time now, and have finally done just that. I’ll most likely be going back for open studio time in the near future, this time with an actual design and project in place.

Letterpress Weekend Course: Day 1

25 Feb

Today was the first of my two day crash course on learning how to set and operate a letterpress machine and type. I am incredibly in love.

I have wanted to take a course like this for several years now. I was always either too busy with actual classes that lead to a degree or I would have just missed a deadline whenever the idea popped back into my mind. This year, however, I was determined.

I found the course being offered at a local art school – Montserrat College of Art – and eagerly awaited registering and paying as soon as I could.

Today we learned the basics. How to set type correctly, how to use the machines, how to care for all the materials, techniques, etc. Our instructor was very friendly and insanely knowledgeable about all things letterpress – as well as lots of other things too!

The group of six in the class we all given a topic and asked to set type based on the theme. Our instructor showed us one from a previous class for which the topic was “food”. I wished that was today’s topic (If you’re new to this here blog, just take a look around, you’ll see why). Instead, we got “Myths”. Fine. I’ll work with it.

After setting my type (see the above pic – I apologize for the quality, I didn’t think to bring my actual camera today) we all then put our random thoughts and ideas regarding myths together. The press we used for this project was a Vanderbilt 219.

The final result:

I did the last line “SHE SANG THEM to THEIR DEATHS”. For some reason the only myth I could remember for the life of me was that of the Sirens in Greek mythology. I was super excited to have found little lobsters though. I love lobster.

Tomorrow I’m not sure what I’ll make. Most likely I’ll make some cards to send out. We’ll see what I come up with I guess…

Cheesy Mushroom Risotto Fritters with Beet Hummus.

21 Feb

First of all. Can we talk about the color of the beet hummus? These pictures have not been enhanced in a way that has changed the color of the hummus dramatically. It actually looks like this in real life. And you can eat it. And it’s all okay.

Beets have been a favorite of mine for a while now. You can pickle them. Put them in a salad. Slice them and make chips. Put them in chocolate cake. (Yes, you can. My pal Joy the Baker shows you how.) The list goes on.

I put them in hummus this time around. And then paired that with cheesy mushroom risotto fritters.

Although it involves a little more time than some dishes (because you’re making the risotto from scratch) the reward is definitely worth the effort. You could actually make the risotto as a dish on its own for one night, and then use the leftovers to make the fritters the next. You could. I couldn’t, I don’t have that kind of patience.

The risotto and the beet hummus really compliment one another well, and the hummus transforms itself into a dipping sauce of sorts for the fritters.

Once you’ve cooked the risotto, you need to let it cool for about an hour. This is the perfect time to make the beet hummus!

Now that you’ve made that (it is insanely simple to make), set it aside and let’s get back to the fritters!

Take the cooled risotto and shape it into little patties. Throw those into some hot oil (I prefer grapeseed oil for frying) and brown ’em up!

At this point of the process, I had made myself pretty freaking hungry. Next step is easy, just plate it and indulge.

How to make the risotto fritters: Continue reading

Saltbox Farm – Concord, Ma

15 Feb

A shoot I helped out on with joe(y). I did some of the styling and whatnot. Great pics! Great food!

Joe And Sometimes (y)

Saltbox Farm is one of those places that somehow manages to capture an amazing essence of New England and distill it down to its truest and purest form. Pastoral fields, chickens running about and a weathered patina that seems to only get better with each passing season.  It’s the kind of place where modern cars somehow seem odd, you would half expect company to arrive via a horse drawn carriage and messages to arrive via telegram.  Owner Chef Ben Elliot’s grandfather built the farm in the 1940’s and modeled it after a 1720’s Saltbox.  Today, Ben carries on the tradition of the farm, using the land to harvest fresh produce, keep livestock and grow his culinary enterprise.  My dear friend, Chef Molly Loveday, has teamed up with Ben at Saltbox; together they not only run the farm but operate a successful catering company and offer private/group culinary classes.  I recently…

View original post 18 more words